• Home
  • About JanisCakes
  • Recipe Index

janis cakes

~ A Nut-Free Cooking Blog

janis cakes

Category Archives: Quick and Easy

Easy Berry Custard Tart

21 Tuesday Apr 2015

Posted by Janis Chanin in Dessert, Fruit, Quick and Easy

≈ Leave a comment

Tags

berry tart, custard pie, fresh berries

Easy Berry Custard Tart

I absolutely hate not sticking to my personal goal of posting one janiscakes recipe per week, and it’s honestly been killing me that I’ve been so sporadic lately.  I also personally hate the excuse of “I’ve been so busy!” (Honestly–raise your hand if you aren’t busy?  Anybody….?  Exactly!) …but, I’ve been busy.  (Ugh, I hate myself a little bit right now for even saying it.)  To clarify, in the span of three days, I:  1) bought a house  2) bought a new car  3) started a new job.  I then proceeded to travel for the new job’s orientation and training, finalize paint colors, buy furniture, and coordinate with various contractors to begin work on the home so it would be move-in-ready two weeks later.  This was all on top of spending all my “free time” (cough cough-what free time?) packing, patching holes in my apartment to ensure getting my security deposit back, officially changing my address with credit cards, the post office, magazine subscriptions,… and everything else that comes along with moving.  Fortunately, I’ve been blessed with an incredible husband who’s been right by my side through everything and picked up a ton of my slack.  I’m also really lucky to have the world’s greatest parents who have done everything they could to help ease the transition into all this new-ness.  Anyhow, please accept my most sincere apologies for missing a post or two.  I promise to hop right back on the wagon starting now!

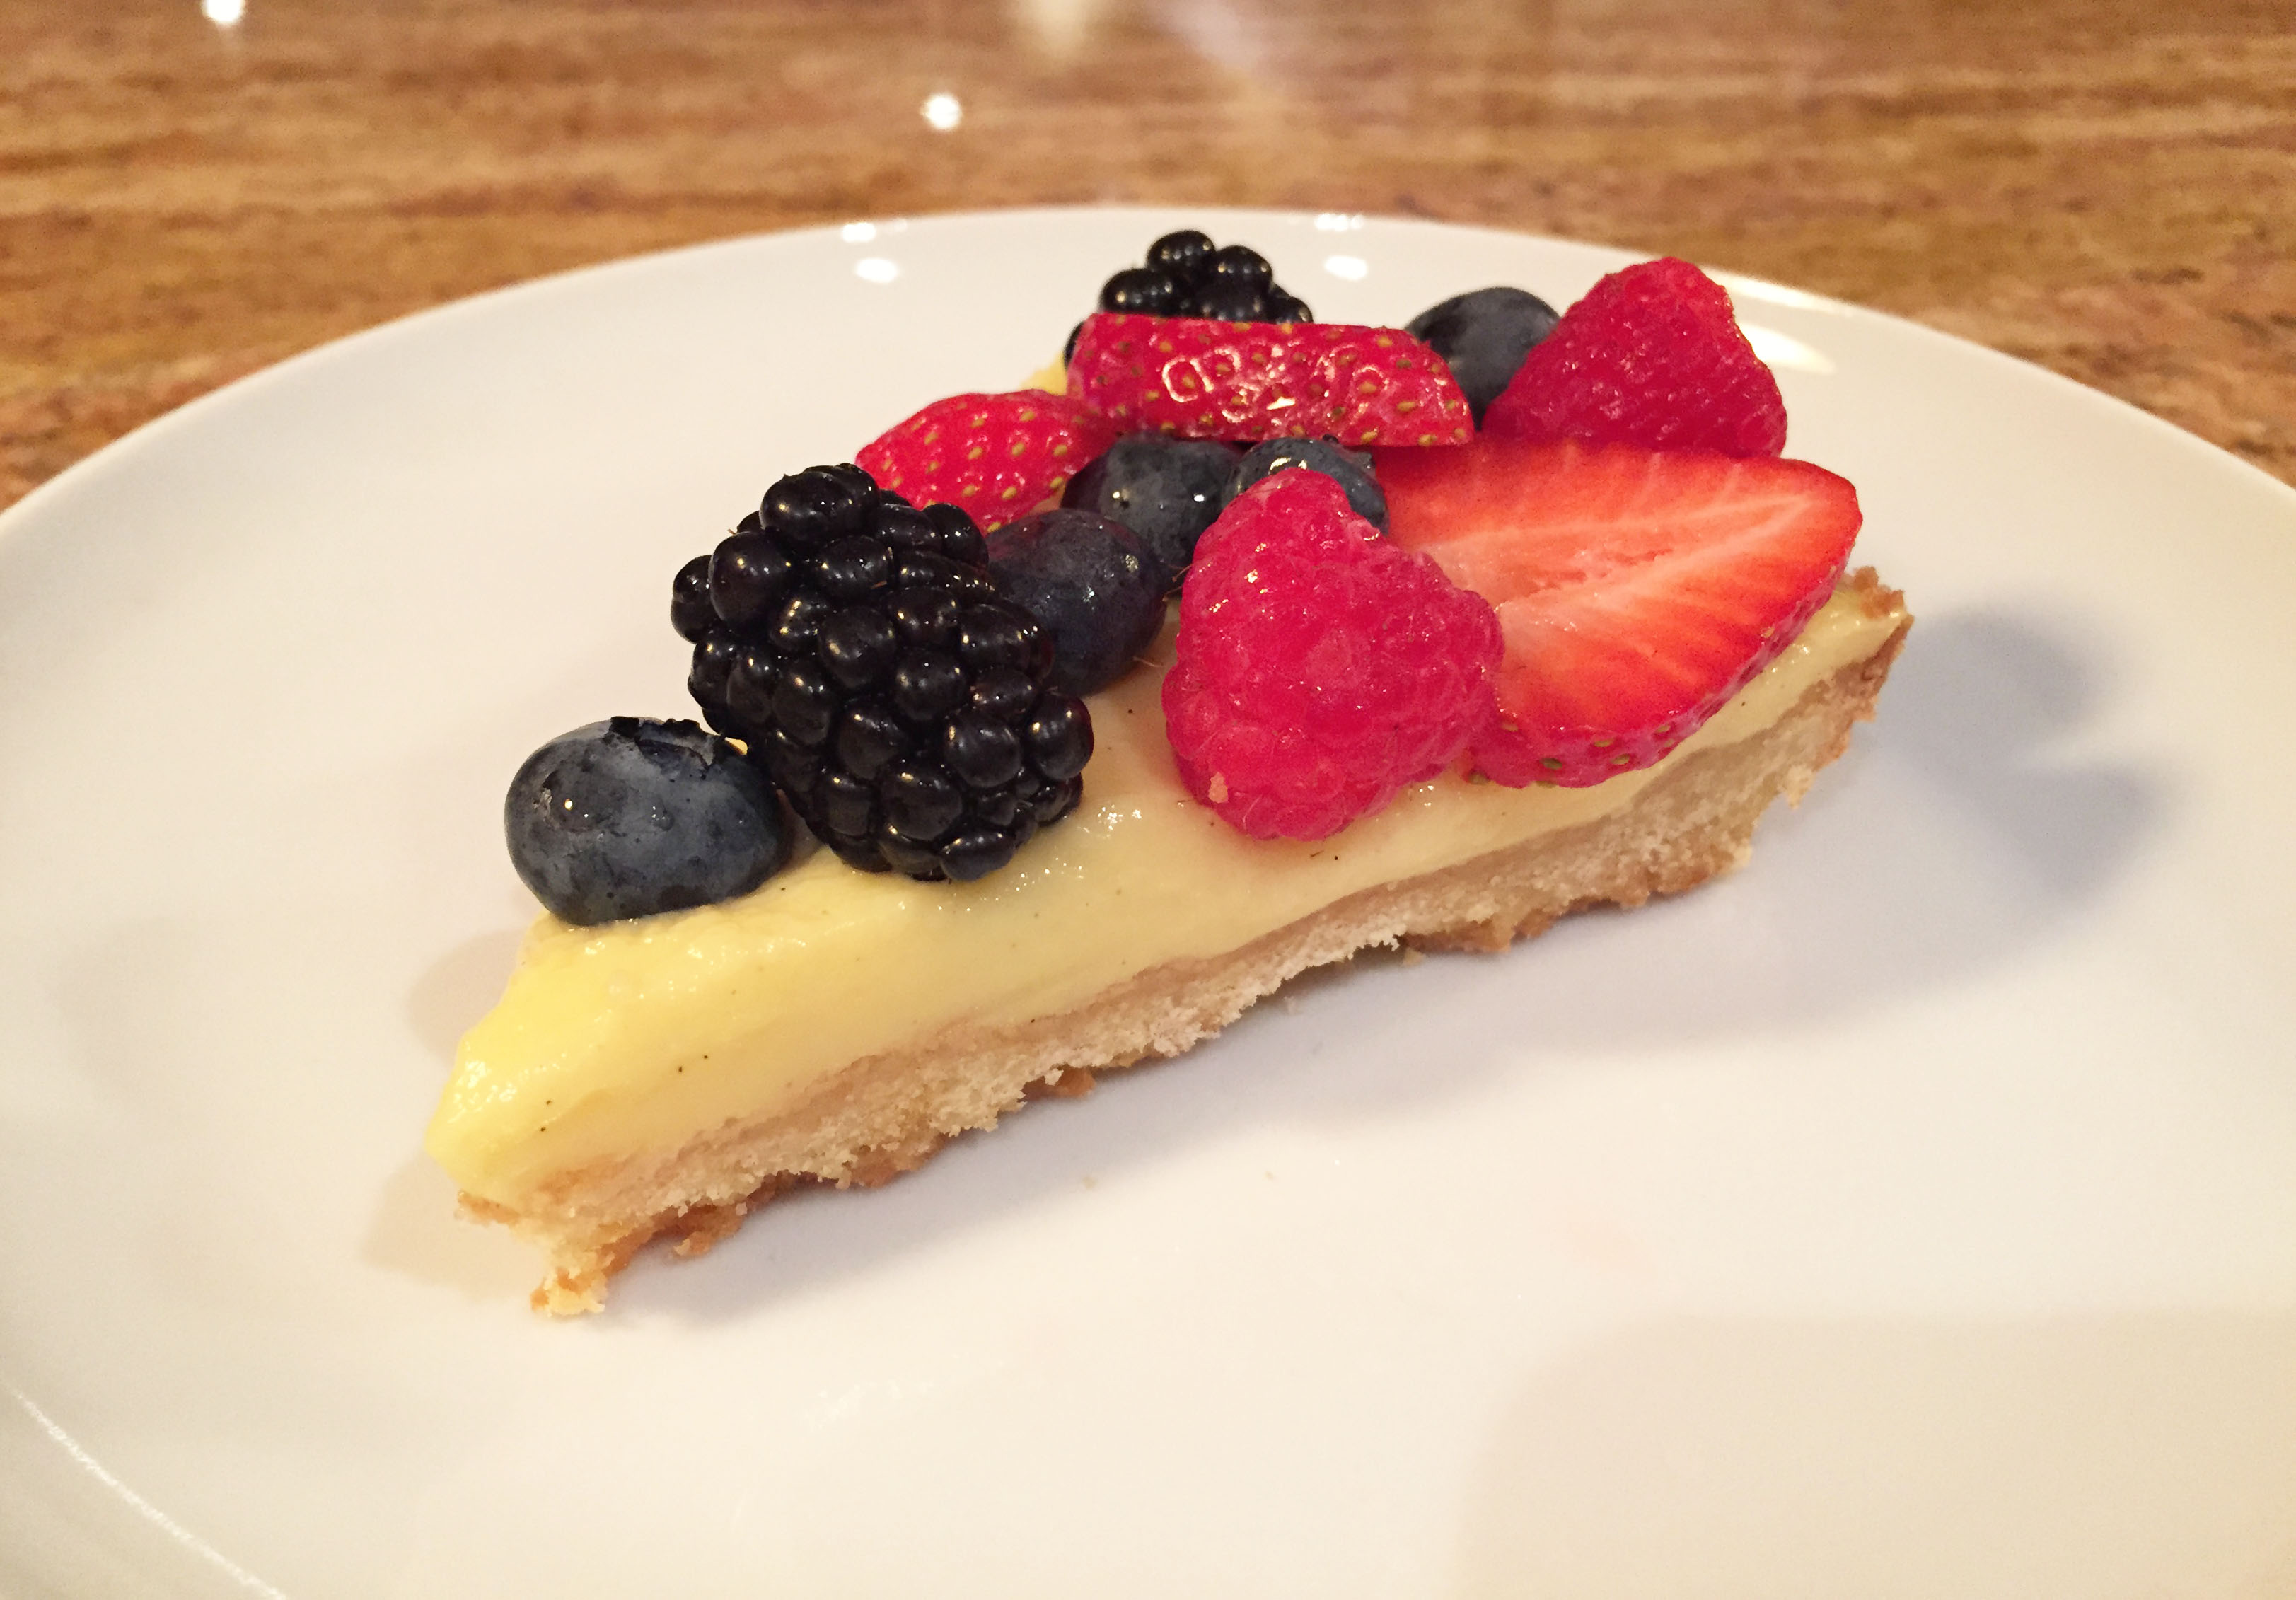
It’s an understatement to say I’ve been crunched for time lately, but hey–a girl still needs dessert!  Enter this recipe.  What makes this tart so easy?  Rather than making pastry cream, fill it with vanilla pudding instead!  I know the “Cook and Serve” pudding takes (slightly) more effort to make than the instant does, but it’s hardly any more work and the flavor of the cooked pudding is soooooo much better for this recipe!  It comes out deliciously rich and creamy and much more closely mimics custard.  Enjoy, my friends!

Easy Berry Custard Tart
Yield:  8 servings
Time:  15 minutes active; 3 hours total

For the crust:
1½ cups flour
½ cup sugar
¼ tsp. salt
½ cup (8 tbsp.) cold (frozen!) butter, cut into cubes
1 egg yolk
2 tbsp. whole milk
1 tsp. vanilla extract
zest of half an orange

For the custard filling:
1 cup skim milk
1 cup whole milk
1 tsp. vanilla bean paste (or vanilla extract)
1 box (3 oz.) of “Cook and Serve Vanilla pudding” (not instant pudding)

For the topping:
4 cups total of mixed berries (strawberries, blackberries, raspberries, blueberries…)
Confectioner’s sugar
Whipped cream

1.  To make the crust, combine the following ingredients in a food processor: flour, sugar, salt, butter.  Pulse until the mixture resembles a coarse meal.

2.  Whisk together the egg yolk, milk, vanilla, and orange zest.  Pour into the food processor and pulse to combine.  Pour into a lightly greased 9-inch diameter tart pan (or regular pie pan).  To help it slide right out after it’s baked, be sure to grease the sides of the pan, too!  Firmly press the crumbs into the bottom and sides of the pan.  Place in the freezer for 15 minutes.  Gently prick the surface with the tines of a fork.  Line with parchment paper and pour in pie weights (if you have them).  Bake at 425ºF for 5 minutes.  Remove the pie weights and parchment paper.  Reduce the oven temperature to 350ºF and bake for another 15-20 minutes, until golden brown.  Allow to cool at room temperature.

3.  In a medium sized saucepan, whisk together the skim milk, whole milk, pudding mix, and vanilla.  Bring to a light boil over medium heat, stirring constantly.  Boil for 2-3 minutes, until thickened.  Remove from the heat and pour into the prepared crust.  Allow to cool at room temperature for about 5-10 minutes, then top with fresh berries.   Cover with plastic wrap and refrigerate until serving, 2-24 hours.  Garnish with whipped cream and lightly dust with confectioner’s sugar prior to serving, if desired.

PDF to Print Recipe for Easy Berry Custard Tart

Share this:

  • Click to email a link to a friend (Opens in new window) Email
  • Click to share on Facebook (Opens in new window) Facebook
  • Click to share on X (Opens in new window) X
  • Click to share on Pinterest (Opens in new window) Pinterest
Like Loading...

Sliced Ahi Tuna Atop Arugula

07 Tuesday Apr 2015

Posted by Janis Chanin in Dinner, Fish, Healthy, Quick and Easy, Salad

≈ Leave a comment

Tags

ahi tuna salad, arugula, wasabi ginger tuna

Sliced Ahi Tuna Atop Arugula

Sliced Ahi Tuna Atop Arugula
Yield:  2 dinner portions
Time:  15 minutes active plus up to one hour marinating

For the tuna:
Two 6-oz. filets of ahi tuna
3 tbsp. rice wine vinegar
¼ cup low sodium soy sauce
1½ tsp. wasabi powder

For the salad:
4 cups baby arugula
3 tbsp. rice wine vinegar
3 tbsp. low sodium soy sauce
½ tsp. sugar
½ tsp. wasabi powder
1 tsp. finely grated fresh ginger*
½ a large cucumber, cut into bite-sized pieces
1 avocado, sliced
4 tbsp. pickled ginger

1.  To prepare the tuna, whisk together the rice wine vinegar, soy sauce, and wasabi powder until the wasabi is fully dissolved.  Place this mixture into a ziplock bag with the tuna and marinate in the refrigerator for up to one hour.

2.  Lightly coat a non-stick skillet with cooking spray.  Heat the skillet over medium-high heat for 2 minutes.  Place the marinated tuna in the hot skillet and sear for two minutes per side (or longer if you prefer it to be a bit more cooked through).

3.  Meanwhile, prepare the salad:  Whisk together the rice wine vinegar, soy sauce, sugar, wasabi powder, and fresh ginger.  Toss with the arugula and cucumber.  Place in a heap in the center of a plate.

4.  Arrange the sliced avocado and pickled ginger in a fan shape around the arugula.

5.  Thinly slice the seared ahi tuna and place atop the arugula.  Enjoy!

PDF to Print Recipe for Sliced Ahi Tuna Atop Arugula

Share this:

  • Click to email a link to a friend (Opens in new window) Email
  • Click to share on Facebook (Opens in new window) Facebook
  • Click to share on X (Opens in new window) X
  • Click to share on Pinterest (Opens in new window) Pinterest
Like Loading...

Roasted Brussels Sprouts with Prosciutto

26 Thursday Mar 2015

Posted by Janis Chanin in Dinner, Quick and Easy, Side Dishes

≈ Leave a comment

Roasted Brussels Sprouts with Proscuitto

Do you fall into the camp of people who believes that bacon makes everything better?  If so, you’re going to love this recipe!  The salty prosciutto combined with the freshness of the lemon makes this a winner of a side dish!

Roasted Brussels Sprouts with Prosciutto
Yield:  3 side dish servings
Time:  5 minutes active, 35 minutes total

18 oz. Brussels sprouts
one large white onion
12 oz. thinly sliced prosciutto
2 tbsp. extra virgin olive oil
zest of half a lemon
¼ tsp. pepper

1.  Lightly grease a large baking sheet.  Preheat your oven to 400ºF.

2.  Meanwhile, wash the Brussels sprouts.  Chop off and discard the tough ends.  Cut the smaller sprouts in half, and cut the larger sprouts in quarters.  Place in a medium sized mixing bowl.

3.  Coarsely chop the onion and prosciutto.  Place in the bowl with the sprouts.  Toss with the olive oil, lemon zest, and pepper.

4.  Spread onto the prepared baking sheet and roast in the oven at 400ºF for 30 minutes, until the prosciutto and some of the outer leaves of the Brussels sprouts begin to crisp.

PDF to Print Recipe for Roasted Brussels Sprouts with Prosciutto

Share this:

  • Click to email a link to a friend (Opens in new window) Email
  • Click to share on Facebook (Opens in new window) Facebook
  • Click to share on X (Opens in new window) X
  • Click to share on Pinterest (Opens in new window) Pinterest
Like Loading...

Lentil and Balsamic Skirt Steak Salad

26 Thursday Feb 2015

Posted by Janis Chanin in Dinner, Healthy, Quick and Easy, Salad

≈ Leave a comment


Lentil and Balsamic Skirt Steak Salad

Lentil and Balsamic Skirt Steak Salad
Time:  15 minutes hands-on; 45 minutes total
Yield:  4 dinner portions

For the steak:
1 lb. skirt steak
¼ cup balsamic vinegar
2 garlic cloves
¾ tbsp. fresh rosemary
1 tsp. dried oregano
1 tbsp. whole grain mustard
1/3 cup olive oil
½ tsp. salt
¼ tsp. pepper

For the salad:
1 cup dry green lentils
2 cups water
8 cups mixed greens
2 large handfuls cherry tomatoes
2 avocados, diced
4 oz. bleu cheese, crumbled
2 tbsp. balsamic vinegar
2 tbsp. olive oil
3 tbsp. reduced balsamic or balsamic glaze (usually available in a squirt bottle in the salad dressing aisle of your grocery store)

1.  Prepare the marinade for the steak:  Place the balsamic vinegar, garlic, rosemary, oregano and mustard in a food processor or blender.  Blend until the garlic and rosemary are pulverized.  Add the oil and blend until creamy.  Season with salt and pepper.  Place in a ziplock bag with the steak, massaging the marinade into the meat.  Marinate at room temperature for 30 minutes, or refrigerate for up to 24 hours.

2.  Meanwhile, sort through the lentils, making sure there are no stones mixed in.  Rinse.  Place in a medium sized saucepan with 2 cups of water.  Bring to a boil, then reduce the heat to low and cover.  Allow to simmer for 30 minutes, until tender.

3.  As the lentils cook, begin to prepare the salads.  Toss together the mixed greens, cherry tomatoes, diced avocado, and bleu cheese.  Add 2 tbsp. olive oil and 2 tbsp. of balsamic vinegar.  Toss to coat.

4.  Once the lentils are tender, remove from the heat and stir in 3 tbsp. of reduced balsamic.  Toss with the other salad ingredients and divide between four plates.

5.  Spray a sauté pan with cooking spray and heat over high heat until screaming hot, about 2 minutes.  Place the steak in the pan, and sear each side for about 3 minutes.  Remove from the heat, slice against the grain (slicing with the grain will make it taste tough), and arrange over the prepared salads.  Enjoy!

Note:  Of course if you have access to a grill, grilling the steak is a great option!  If you do not have access to one (perhaps you live in a city like me or it’s just the middle of winter and you haven’t shoveled a path to your grill!), this stovetop method is a great alternative!

PDF to Print Recipe for Lentil and Balsamic Skirt Steak Salad

Share this:

  • Click to email a link to a friend (Opens in new window) Email
  • Click to share on Facebook (Opens in new window) Facebook
  • Click to share on X (Opens in new window) X
  • Click to share on Pinterest (Opens in new window) Pinterest
Like Loading...

Mini Spinach Artichoke Cups

02 Monday Feb 2015

Posted by Janis Chanin in Appetizers, Quick and Easy, Vegetarian

≈ Leave a comment

Tags

spinach artichoke

Mini Spinach Artichoke Cups

I’ve always been a fan of spinach artichoke dip, but it can get really messy, sliding off pita chips and other dippers en route to my mouth!  I wanted a bite-sized version of the classic favorite while simultaneously removing some of the excess creaminess of the traditional recipe.  Many recipes for Spinach Artichoke Dip contain cream cheese, mayo, sour cream, and/or melted cheese.  The only dairy in this recipe is feta cheese, providing a nice flavor while eliminating loads of unnecessary fat and calories.

Mini Spinach Artichoke Cups
Yield:  24 bites
Time:  15 minutes active;  30 minutes total

10 oz. canned artichokes
6 oz. sun-dried tomatoes packed in oil
16 oz. frozen chopped spinach (thawed and excess water drained and squeezed out)
3 oz. feta cheese, crumbled
8 oz. package Pillsbury crescent rolls

1.  Dice the artichokes and sun-dried tomatoes into small pieces and place in a mixing bowl.  Drizzle in 1-2 tbsp. of the oil from the sun dried tomatoes.  Stir in the spinach and feta.  Stir ingredients together to combine.

Mini Spinach Artichoke Cups

2.  Preheat the oven to 375ºF.  Lightly grease the wells of a mini muffin pan.  Set aside.

3.  Unroll the sheet of crescent rolls and gently press together any perforations, creating one large rectangle.  Cut into 24 squares and gently press each square into the prepared wells of the mini muffin pan, allowing the edges to overhang the well slightly.  Fill each well with the spinach-artichoke-feta filling.  Bake at 375ºF for about 15 minutes, until edges of crescent begin to turn golden brown.

Mini Spinach Artichoke Cups Mini Spinach Artichoke Cups Mini Spinach Artichoke Cups

PDF to Print Recipe for Mini Spinach Arichoke Cups


Recipe adapted from http://www.pillsbury.com

Share this:

  • Click to email a link to a friend (Opens in new window) Email
  • Click to share on Facebook (Opens in new window) Facebook
  • Click to share on X (Opens in new window) X
  • Click to share on Pinterest (Opens in new window) Pinterest
Like Loading...
← Older posts
Newer posts →

Enter your email address to follow JanisCakes and receive each new post by email.

This slideshow requires JavaScript.

Categories

Recent Posts

  • Soft Pumpkin Cookies with Apple Cider Glaze
  • Chicken Enchiladas
  • Ham, Apple and Brie Quesadilla
  • Cauliflower Bowtie Pasta
  • Loaded Baked Potatoes
  • Flank Steak Salad with Chipotle Lime Vinaigrette
  • No Bake Strawberry Pineapple Pie
  • Rhubarb Compote
  • Shiksa-Style Matzo Ball Soup
  • Homemade Caramel Corn

Archives

Enter your email address to follow this blog and receive notifications of new posts by email.

Blog at WordPress.com.

Privacy & Cookies: This site uses cookies. By continuing to use this website, you agree to their use.
To find out more, including how to control cookies, see here: Cookie Policy
  • Subscribe Subscribed
    • janis cakes
    • Join 82 other subscribers
    • Already have a WordPress.com account? Log in now.
    • janis cakes
    • Subscribe Subscribed
    • Sign up
    • Log in
    • Report this content
    • View site in Reader
    • Manage subscriptions
    • Collapse this bar
 

Loading Comments...
 

    %d