• Home
  • About JanisCakes
  • Recipe Index

janis cakes

~ A Nut-Free Cooking Blog

janis cakes

Category Archives: Chocolate

Banana Chocolate Chip Pancakes

20 Thursday Feb 2014

Posted by Janis Chanin in Breakfast, Chocolate, Vegetarian

≈ Leave a comment

Banana Chocolate Chip Pancakes

It was snowing yet again on Tuesday morning in the Northeast.  It feels like this winter has lasted for years!  I needed something yummy for breakfast to boost my mood, so I decided to make banana chocolate chip pancakes because they always make me feel like a child–carefree and happy!  As I stirred the batter I kept singing the lyrics to Jack Johnson’s song Banana Pancakes (“Can’t you see that it’s just raining snowing, ain’t no need to go outside…Maybe we can sleep in, make you banana pancakes, pretend like it’s the weekend now.”)  They did the trick–between the song and the pancakes, I felt much better.  Maybe I could even handle one more snow storm before the winter is finally over for good!

Banana Chocolate Chip Pancakes
Yield:  25-30 pancakes (about 4-inches in diameter)
Time:  40 minutes total

3 cups flour
1/3 cup sugar
3 tsp. baking powder
½ tsp. baking soda
1 tsp. salt
2 cups milk
6 tbsp. butter, melted
2 eggs
2 bananas, mashed
1 cup semi-sweet chocolate chips

additional bananas, for serving
maple syrup, for serving

1.  Whisk together the flour, sugar, baking powder, baking soda, and salt.

2.  In a separate bowl, whisk together the milk, melted butter, eggs, and mashed banana.

3.  Combine the wet and dry ingredients together in several additions, whisking out any large lumps.  Stir in the chocolate chips.

4.  Cook on a lightly greased griddle over medium-low heat.  Once bubbles form on the surface (after about 4 minutes), flip the pancakes.  Heat until cooked through, about another 2 minutes.  Serve topped with sliced bananas and drizzled with maple syrup.  Enjoy!

PDF to Print Recipe for Banana Chocolate Chip Pancakes

Share this:

  • Click to email a link to a friend (Opens in new window) Email
  • Click to share on Facebook (Opens in new window) Facebook
  • Click to share on X (Opens in new window) X
  • Click to share on Pinterest (Opens in new window) Pinterest
Like Loading...

Triple Chocolate Cherry Cookies

05 Wednesday Feb 2014

Posted by Janis Chanin in Chocolate, Dessert

≈ Leave a comment

Triple Chocolate Cherry Cookies

The slight tartness of the dried cherries, the bitterness of the cocoa, the saltiness of the white chocolate and the overall sweetness of these cookies make for the perfect combination!

Triple Chocolate Cherry Cookies
Yield:  3 dozen cookies
Time:  10 minutes active, 30 minutes chilling, 30 minutes baking  (70 minutes total)

2½ sticks of butter, softened
¾ cup sugar
½ cup packed brown sugar
2 eggs
3 tsp. vanilla extract
¾ cup cocoa
2 cups flour
1½ tsp. baking soda
½ tsp. salt
1½ cups chocolate chips
1½ cups white chocolate chips
1½ cups dried cherries

1.  Preheat the oven to 350ºF.  Spray a cookie sheet with baking spray (or spritz with canola oil then lightly dust with flour).

2.  Using a pastry blender, cream together the butter and sugars.  Blend in the eggs and vanilla.

3.  In a separate mixing bowl, combine the flour, cocoa, baking soda and salt.  Gently fold into the butter/sugar mixture until fully incorporated.  Fold in the chocolate chips, white chocolate chips, and dried cherries.

4.  Chill the batter for 30 minutes (or more) in the refrigerator.  Form balls from roughly 1-tbsp of batter.  Drop onto a prepared baking sheet.  Bake for 9-11 minutes, until baked through.  (They should still look moist in the middle, but not overly gooey and wet.)

Enjoy with a tall glass of milk!

PDF to Print Recipe for Triple Chocolate Cherry Cookies

Share this:

  • Click to email a link to a friend (Opens in new window) Email
  • Click to share on Facebook (Opens in new window) Facebook
  • Click to share on X (Opens in new window) X
  • Click to share on Pinterest (Opens in new window) Pinterest
Like Loading...

Football Brownies

23 Thursday Jan 2014

Posted by Janis Chanin in Chocolate, Dessert, Holiday, Quick and Easy

≈ 4 Comments

Football Brownies

In spirit of the upcoming Superbowl, I’ve decided to share with you my football brownies!  These are incredibly easy to make. Get yourself a box of brownie mix and have fun!

Football Brownies
Yield: about 8 brownies (depending on the size of your cookie cutter)
Time:  40 minutes total

1 box of brownie mix (I like to use the Chewy Fudge by Duncan Hines)
canola oil (around ¾ cup, follow instructions on box)
water (around ¼ cup, follow instructions on box)
eggs (probably two, follow instructions on box)
¼ to ½ cup white chocolate chips
football-shaped cookie cutter

1.  Following the instructions and ingredient amounts on the box, combine the brownie mix, canola oil, water, and eggs.  Bake according to the instructions listed on the box.

2.  Allow the brownies to cool fully, then stamp out using a football-shaped cookie cutter.  (The one I used was about 4½ inches long and 3 inches wide.)

3.  Melt the white chocolate and mix until smooth.  Transfer the melted chocolate to a small zip-top bag.  Snip off the teeniest tiniest corner of the bag with scissors.  (Start with a reeeeeeally small cut…smaller than you think is right.  You can always cut more off if needed.)  Squeeze out white chocolate into the shape of football laces on each brownie.  Allow the chocolate to harden before stacking or covering the brownies.

4.  Serve as an easy, adorable, festive dessert for game day!

(PS…feel free to use any leftover melted chocolate to write out “NFL”, “football”, “Superbowl”, the names of the teams playing or your favorite players,…)

Football Brownies


PDF to Print Recipe for Football Brownies

Share this:

  • Click to email a link to a friend (Opens in new window) Email
  • Click to share on Facebook (Opens in new window) Facebook
  • Click to share on X (Opens in new window) X
  • Click to share on Pinterest (Opens in new window) Pinterest
Like Loading...

Holiday Fudge

24 Tuesday Dec 2013

Posted by Janis Chanin in Chocolate, Dessert, Quick and Easy

≈ Leave a comment

Holiday FudgeMerry Christmas Eve!!!

Here’s a fantastic recipe to make as gifts for the holidays!  It’s great for coworkers, your kids’ teachers or daycare workers, hair stylists, or anybody else you want to give a holiday gift to without breaking the bank.  Each Christmas season I usually make one batch of this with dark chocolate chips, and another batch with white chocolate chips.  This makes plenty of fudge for me to give an assortment of white and dark chocolate fudge to various important people in my life!

Holiday Fudge
Yield:  about 100 pieces of fudge (each piece being 1×1-inch square)
Time:  25 minutes active plus 2 hours chilling

4 tbsp. butter
4 cups marshmallows
1 cup heavy cream
2 cups sugar
1/8 tsp. salt
3 cups chocolate chips (dark, milk, or white chocolate)
decorative sprinkles
parchment paper
cooking spray

1.  Prepare a 9×13-inch pan by lining with parchment paper.  Lightly grease the top of the paper with cooking spray.

2.  Place butter in a medium saucepan.  Melt over medium heat.  Stir in cream, sugar, salt, and marshmallows.  Melt together over medium heat for about 5-8 minutes, mixing frequently.

Fudge

3.  Remove from heat.  Stir in chocolate chips.  Mix until smooth.

4.  Pour into prepared pan.  Top with decorative sprinkles.  Refrigerate until firm (2 hours to overnight).  Cut into squares, roughly 1-inch by 1-inch.

NOTE:  I have tried cutting the heavy cream out of this recipe by substituting it with various different ingredients, including fat-free half and half.  Sadly, without the heavy cream, the fudge simply won’t set.  It stays really soft and melty and will not hold its shape.  This is one of those recipes where you just need to use the heavy cream.

PDF to Print Recipe for Holiday Fudge

Share this:

  • Click to email a link to a friend (Opens in new window) Email
  • Click to share on Facebook (Opens in new window) Facebook
  • Click to share on X (Opens in new window) X
  • Click to share on Pinterest (Opens in new window) Pinterest
Like Loading...

Peppermint Bark

18 Wednesday Dec 2013

Posted by Janis Chanin in Chocolate, Dessert, Holiday, Quick and Easy

≈ Leave a comment

Peppermint Bark
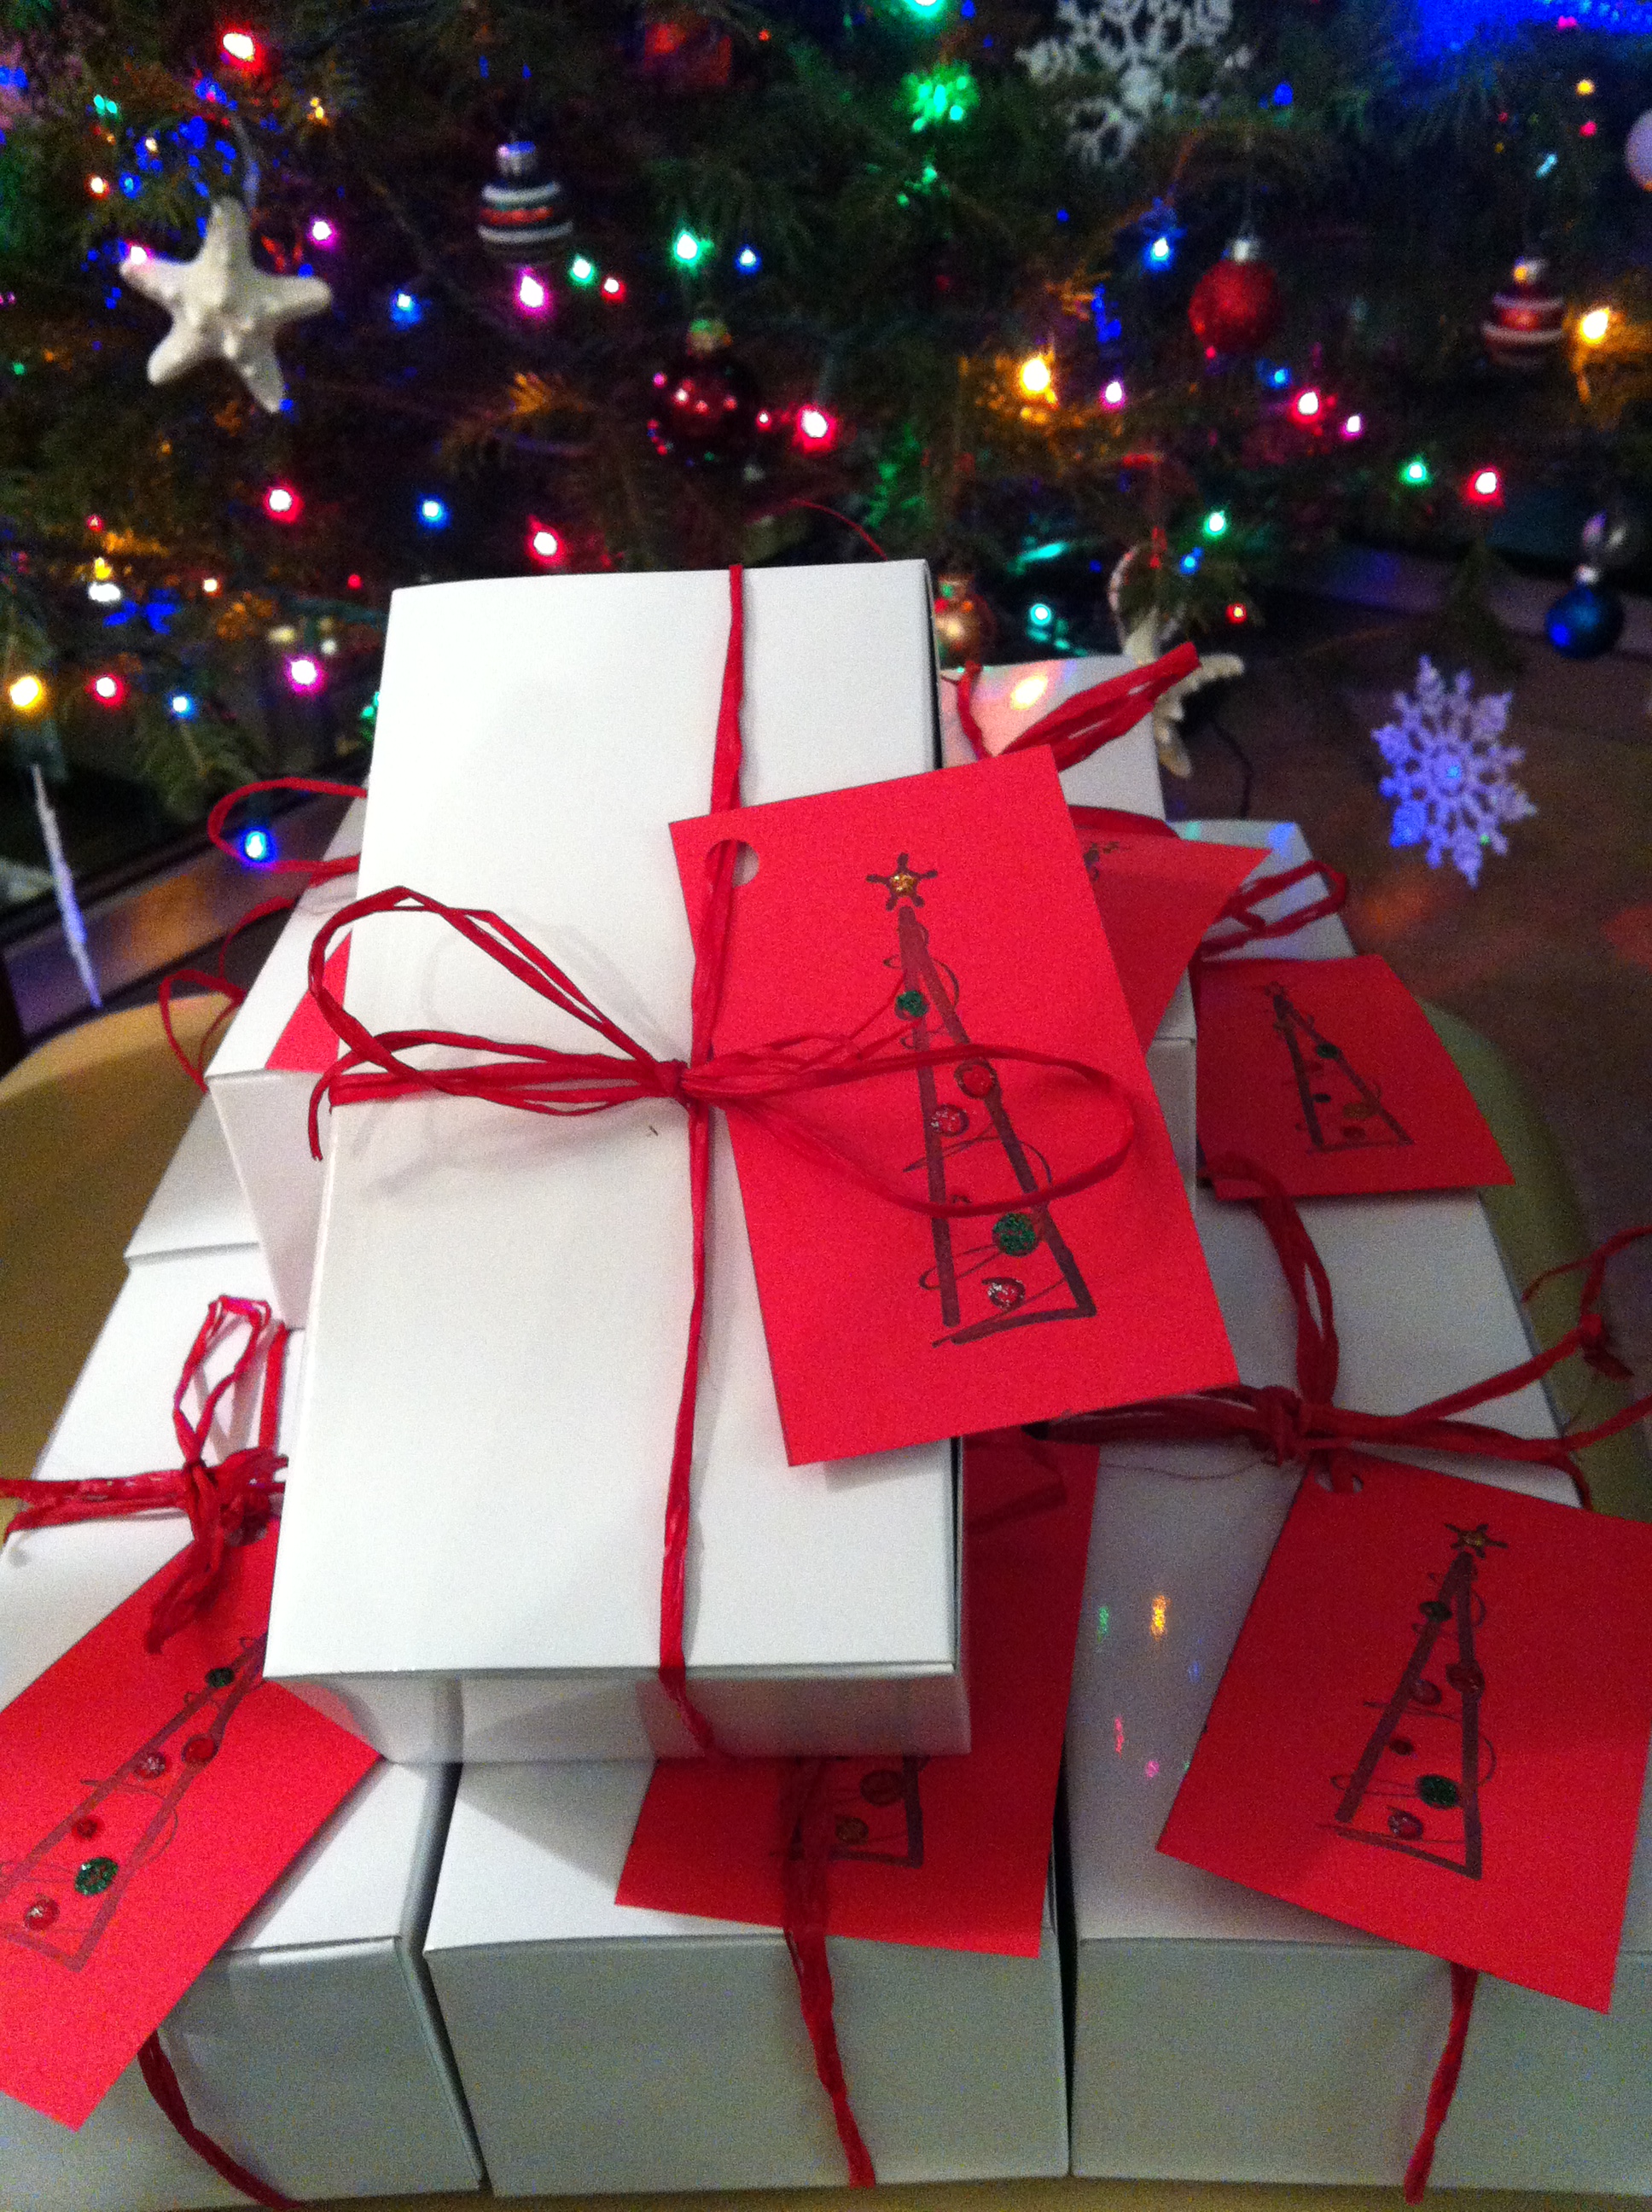
I simply cannot go an entire Christmas season without making this recipe at least once.  I keep some in a bowl on my counter to munch on, I bring it as hostess gifts to holiday parties, it works as a spin on cookies for swaps with friends, and it’s always a crowd pleaser at corporate potlucks!  I love getting creative in the kitchen and trying out tons of new recipes, but this is a staple that’s here to stay!  Plus, it transports really well and it’s super quick and easy to make…who doesn’t love that during this busy holiday season?

Peppermint Bark
Yield:  6-8 gift boxes (6x3x2-inches) or one gallon-sized ziplock bag
Time:  60 minutes total

36 oz dark chocolate
36 oz white chocolate
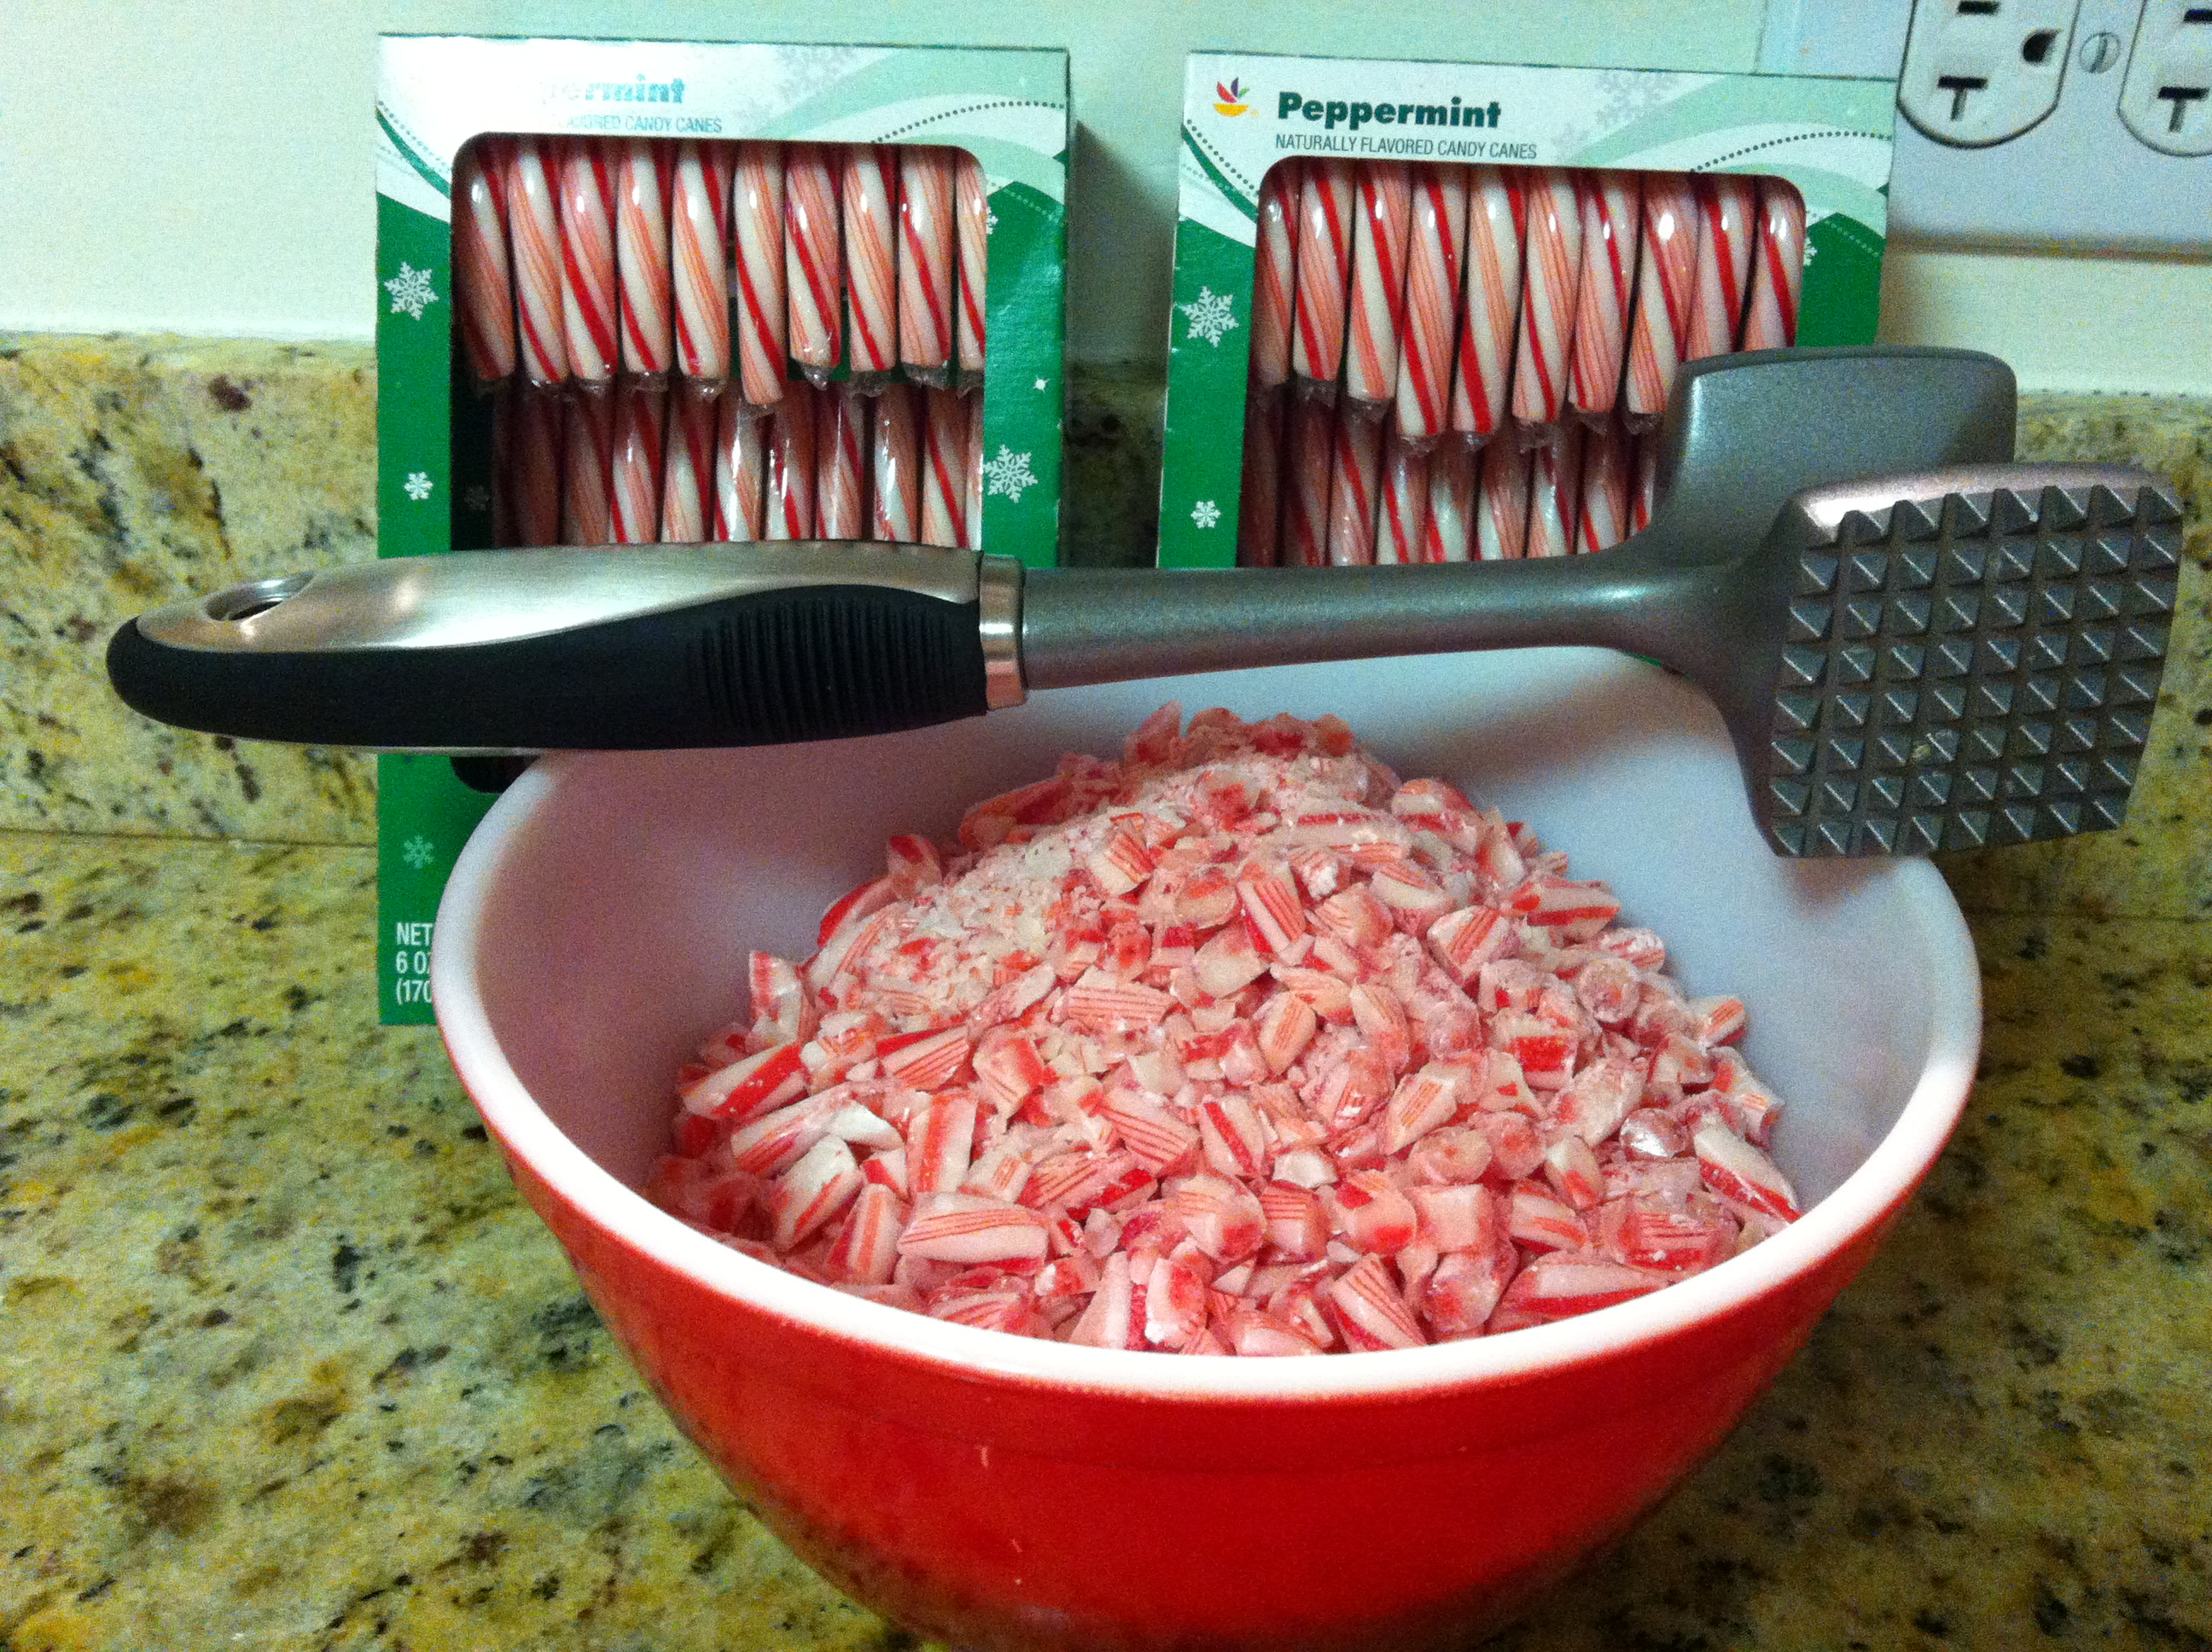
36 candy canes
parchment paper
canola cooking spray

1.  Spray the bottom of the 12×18-inch pan (I use a jelly roll pan).  Line with parchment paper.  Lightly spray the top of the parchment paper.

2.  Unwrap the candy canes (I recommend enlisting help…it gets tedious!) and place them in a large ziplock bag.  Cover the bag with a rag and hit with a mallet until the candy canes are broken up into small pieces.  (Be sure to use a rag you don’t care about since the mallet may punch tons of teeny tiny holes in the fabric!)  Set the crushed candy canes aside, but leave them easily accessible.

crushing candy canes


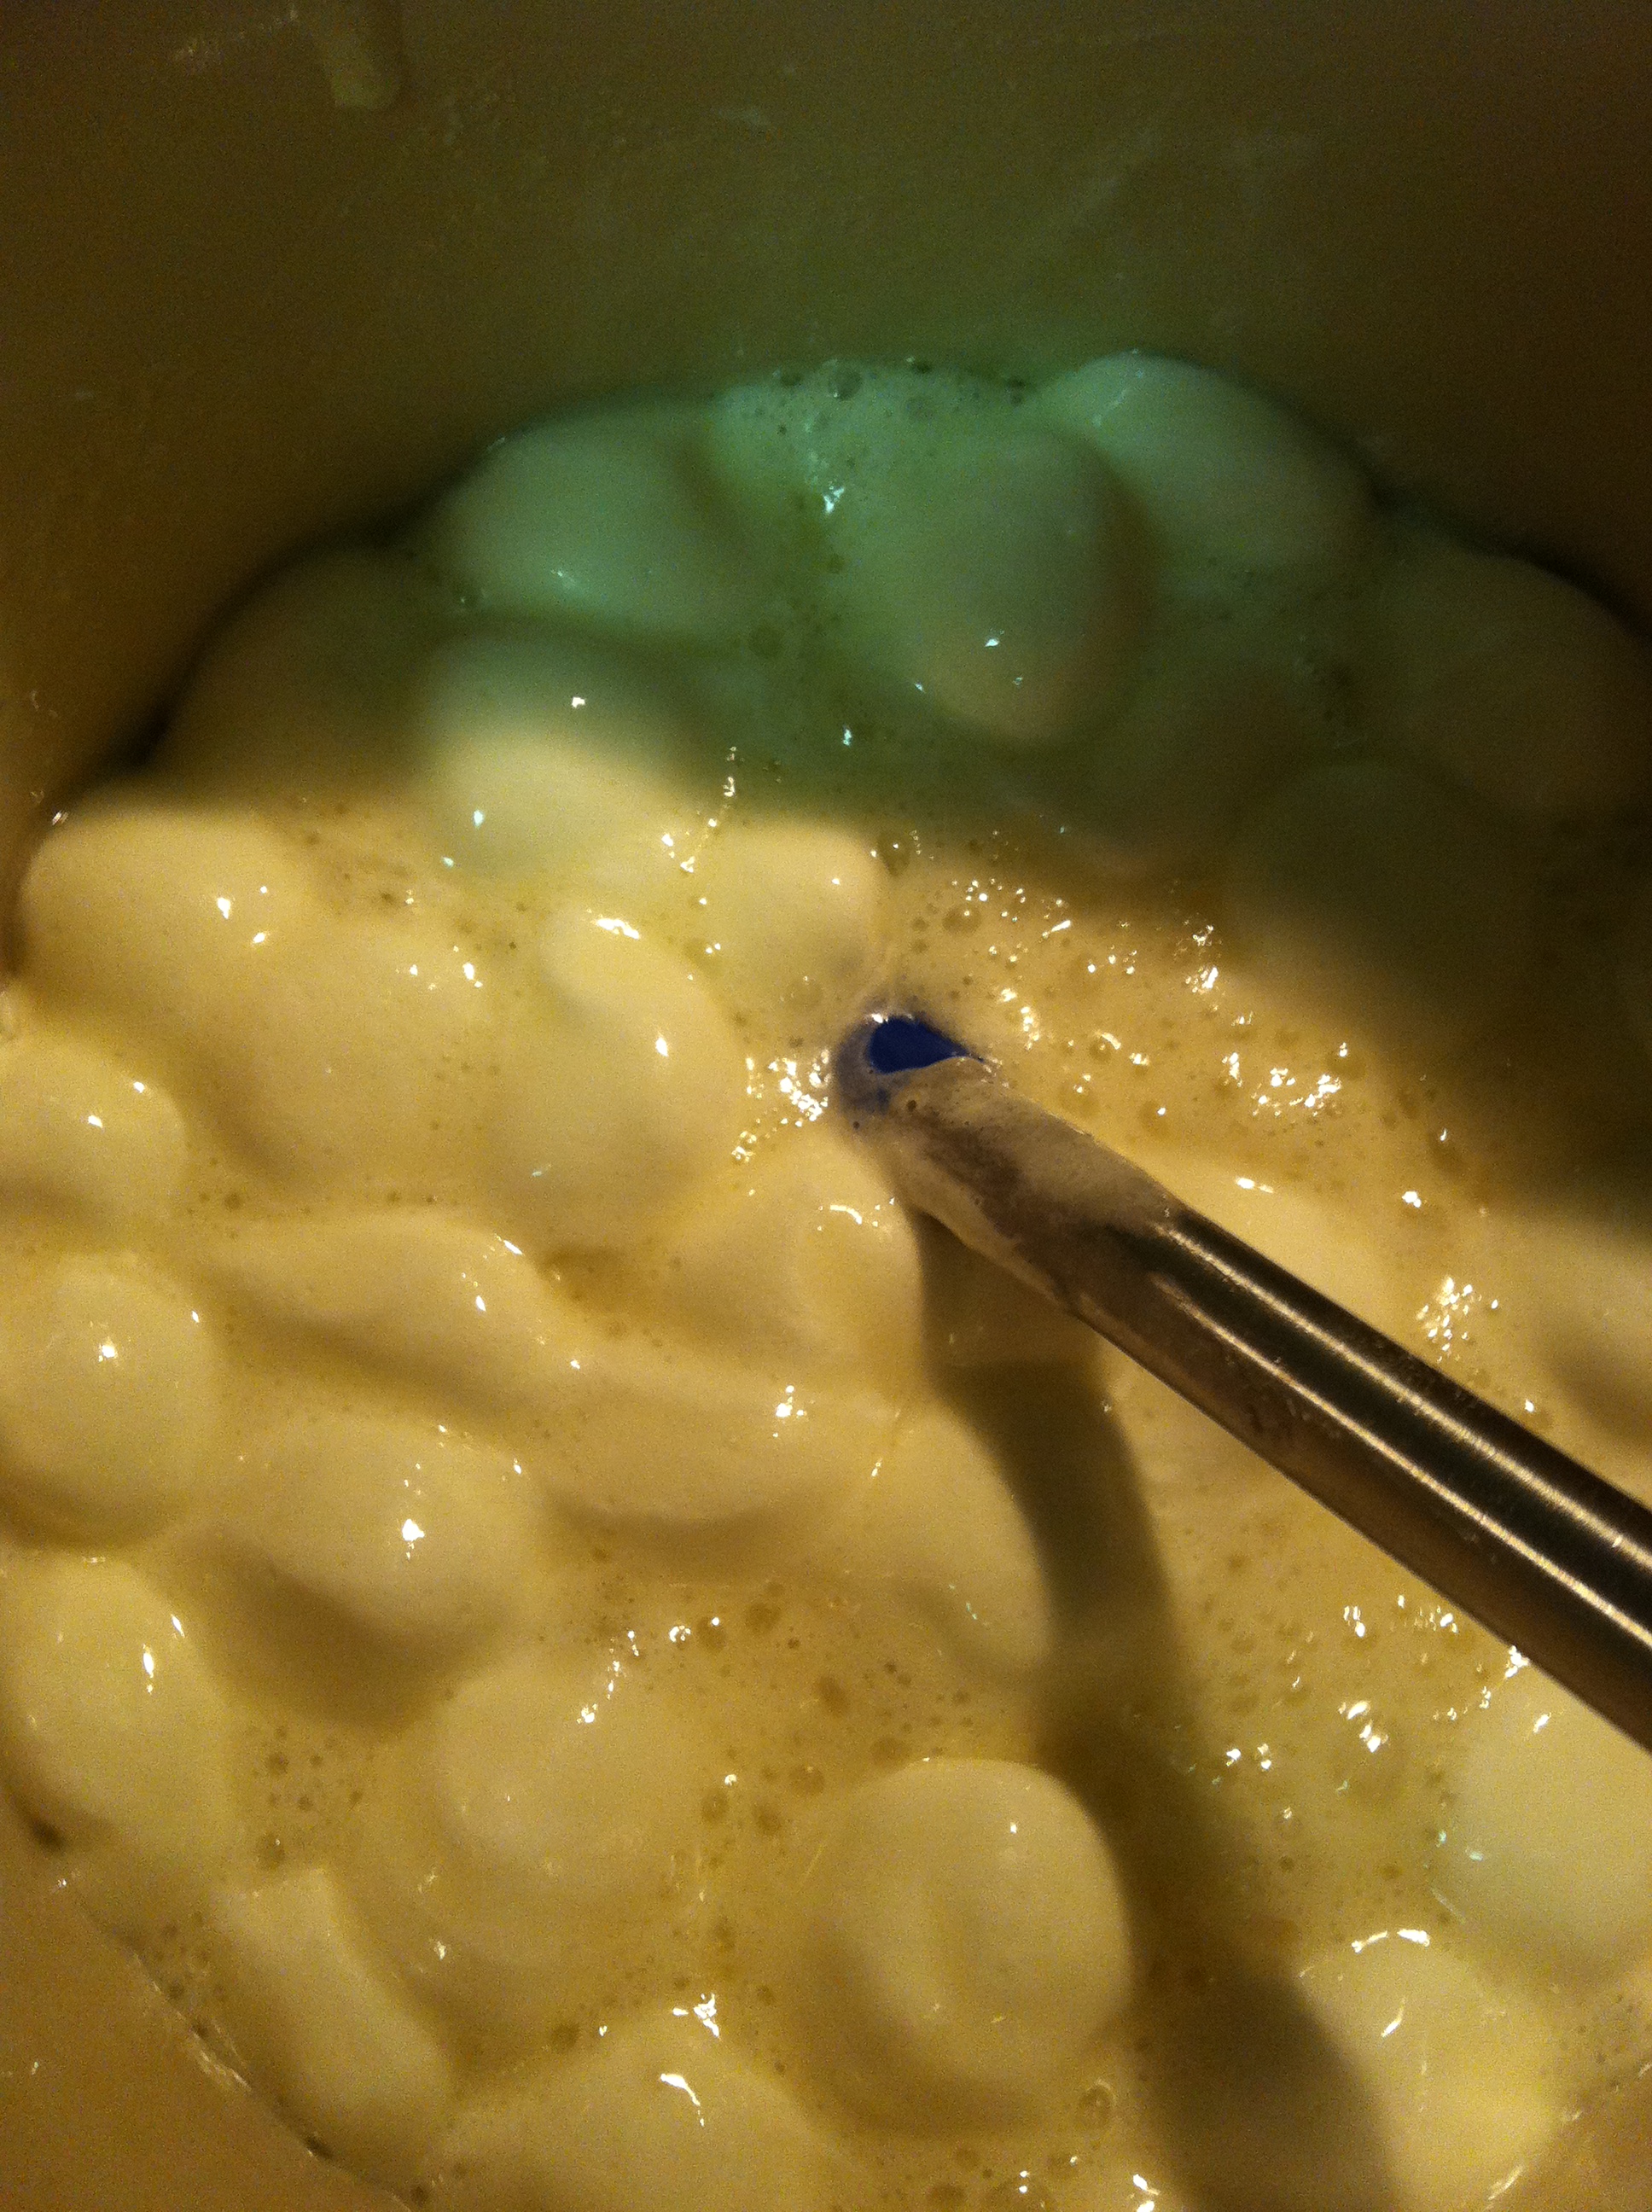
3.  Melt the dark chocolate in the microwave.  I find it works well to use 50% power for about 1 minute, stir, then return to the microwave in 20-30 second increments, to prevent scorching the chocolate.  Once it’s fully melted, pour it into the parchment-lined pan.  Spread it out evenly with a spatula, and tap a few times to pop some of the air bubbles that will form on the top.  Set aside for about 5-10 minutes at room temperature so the chocolate hardens.  It’s ideal if it’s not still wet and runny, but you don’t want it rock solid either.  Just firm enough that you can spread the white chocolate on top.

dark chocolate


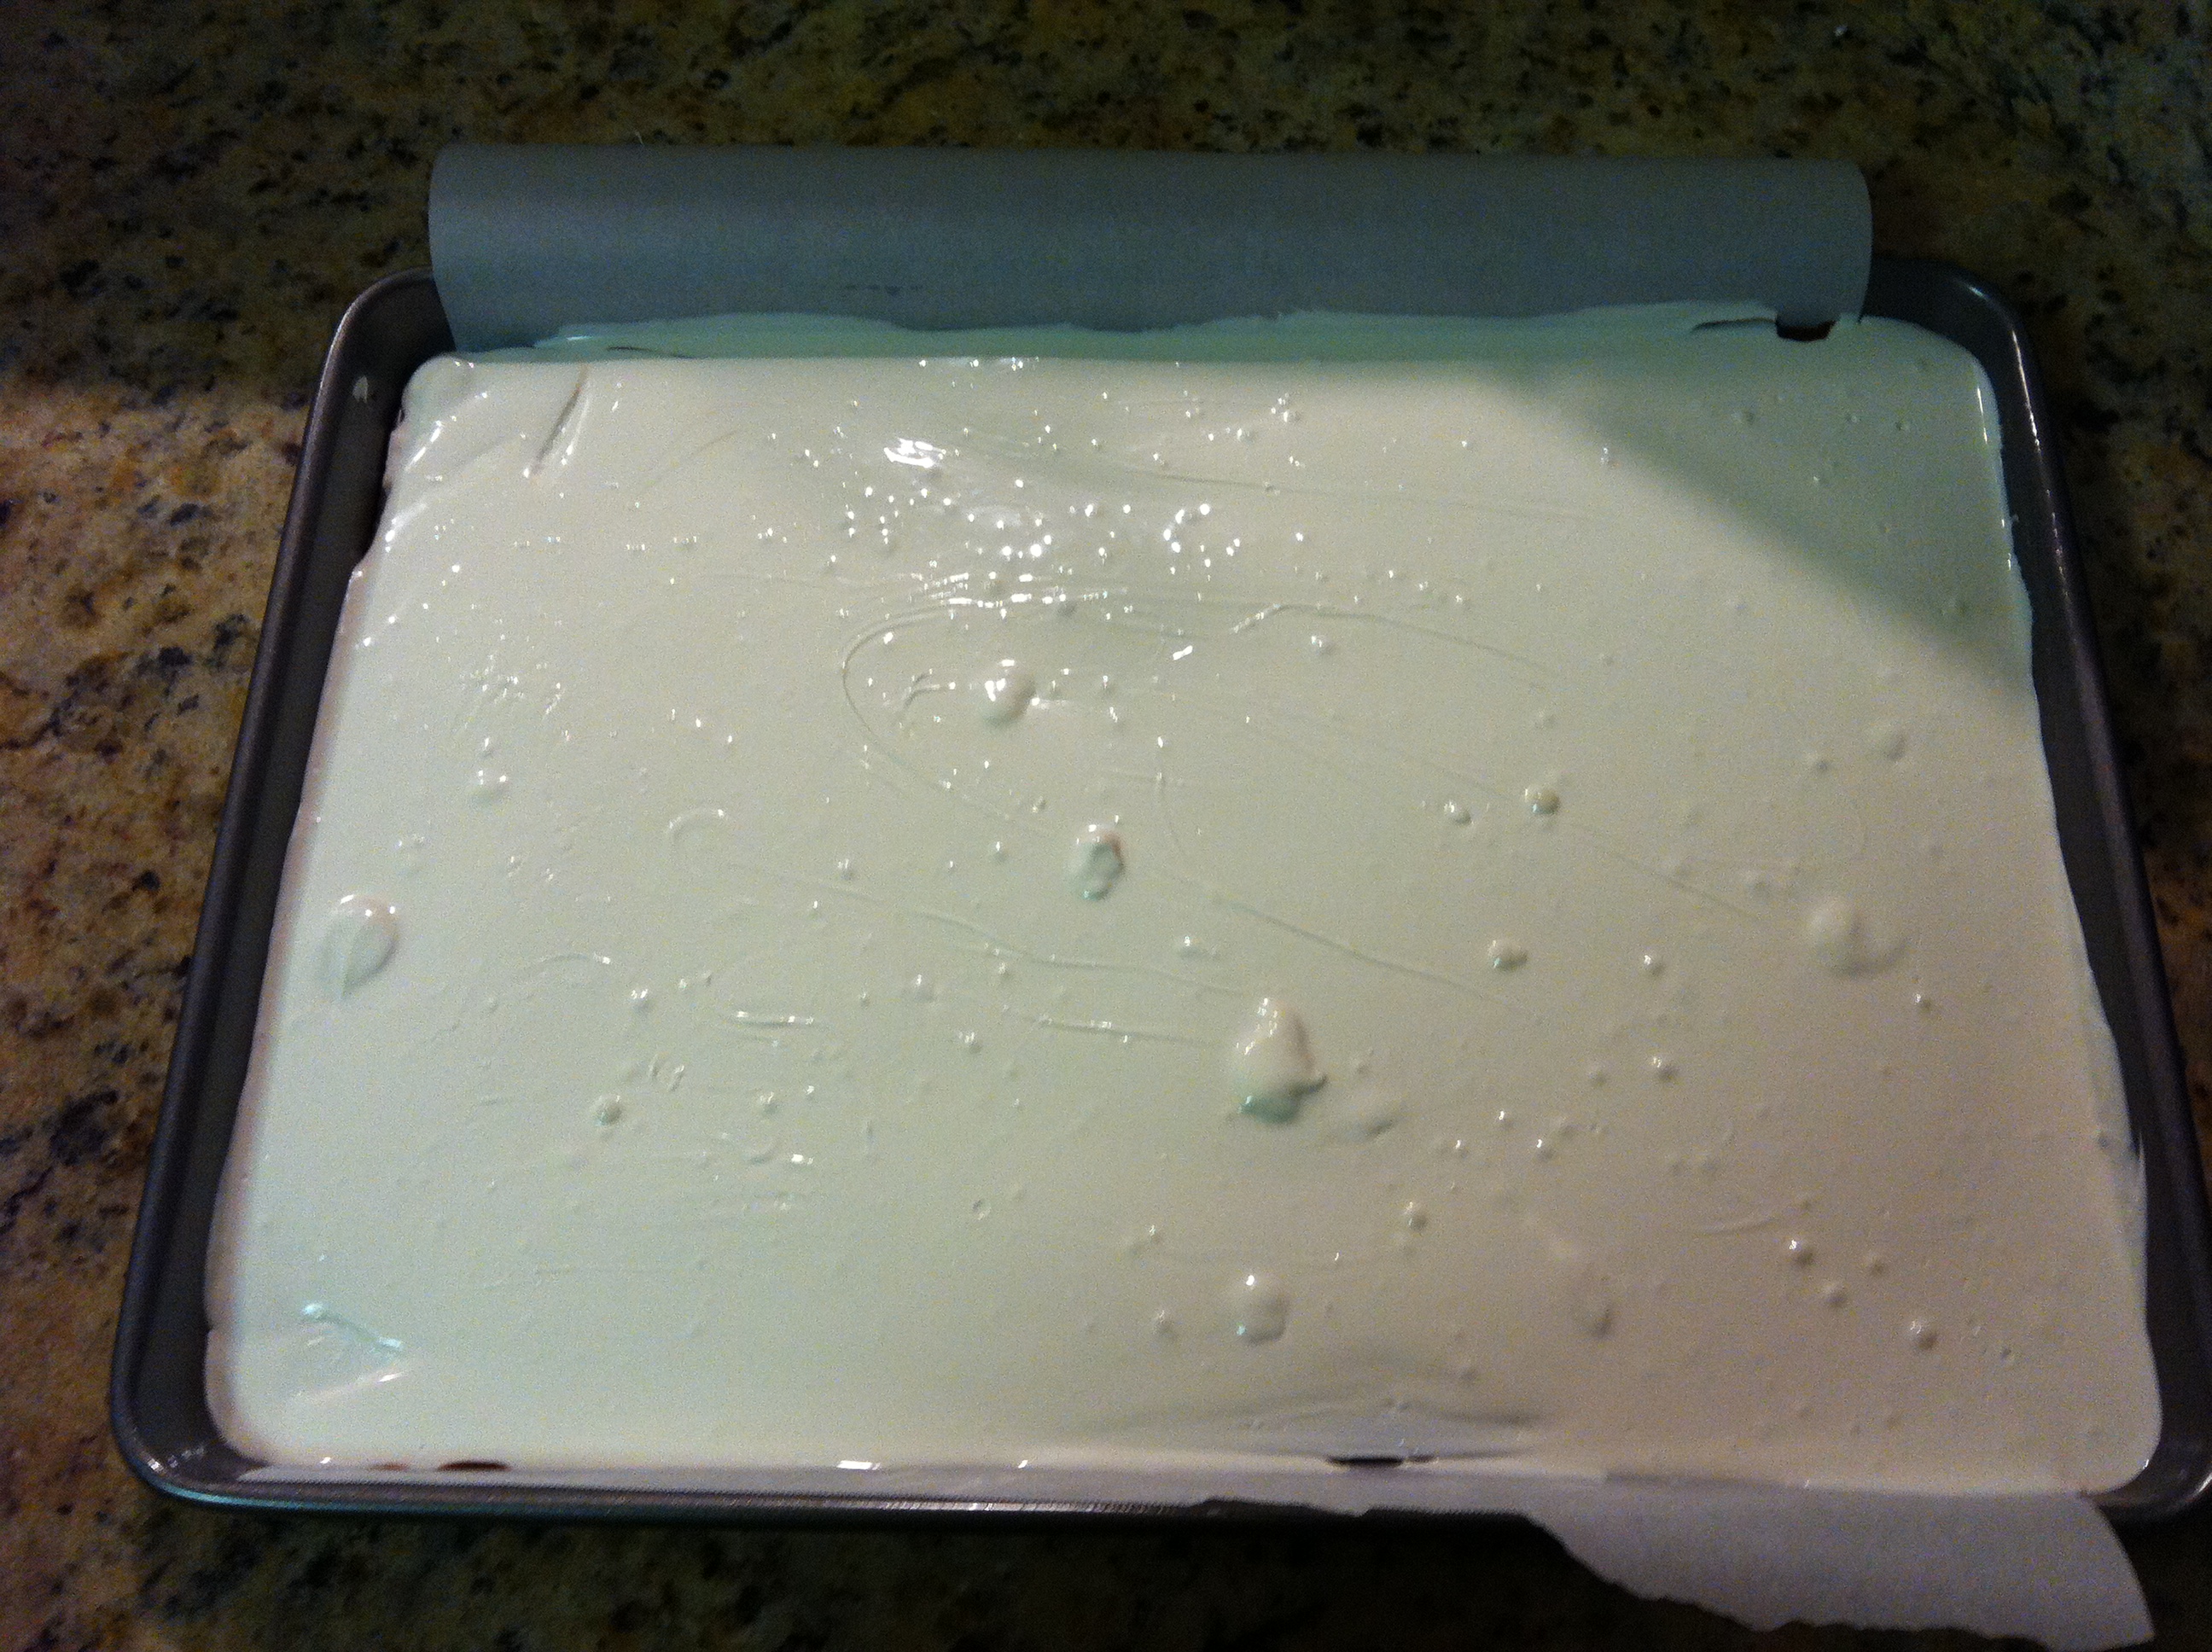
4.  Melt the white chocolate in the microwave.  Pour over the dark chocolate layer, being careful not to spread it around too much.  It will warm the dark chocolate underneath and if you move it around too much you’ll get a swirled effect on the top.  I find it’s best to pour the white chocolate all around the edges of the pan, then dump the rest in the middle to allow for minimal spreading.  Tap a few times to even out the surface and release the air bubbles.

peppermint bark 8

white chocolate


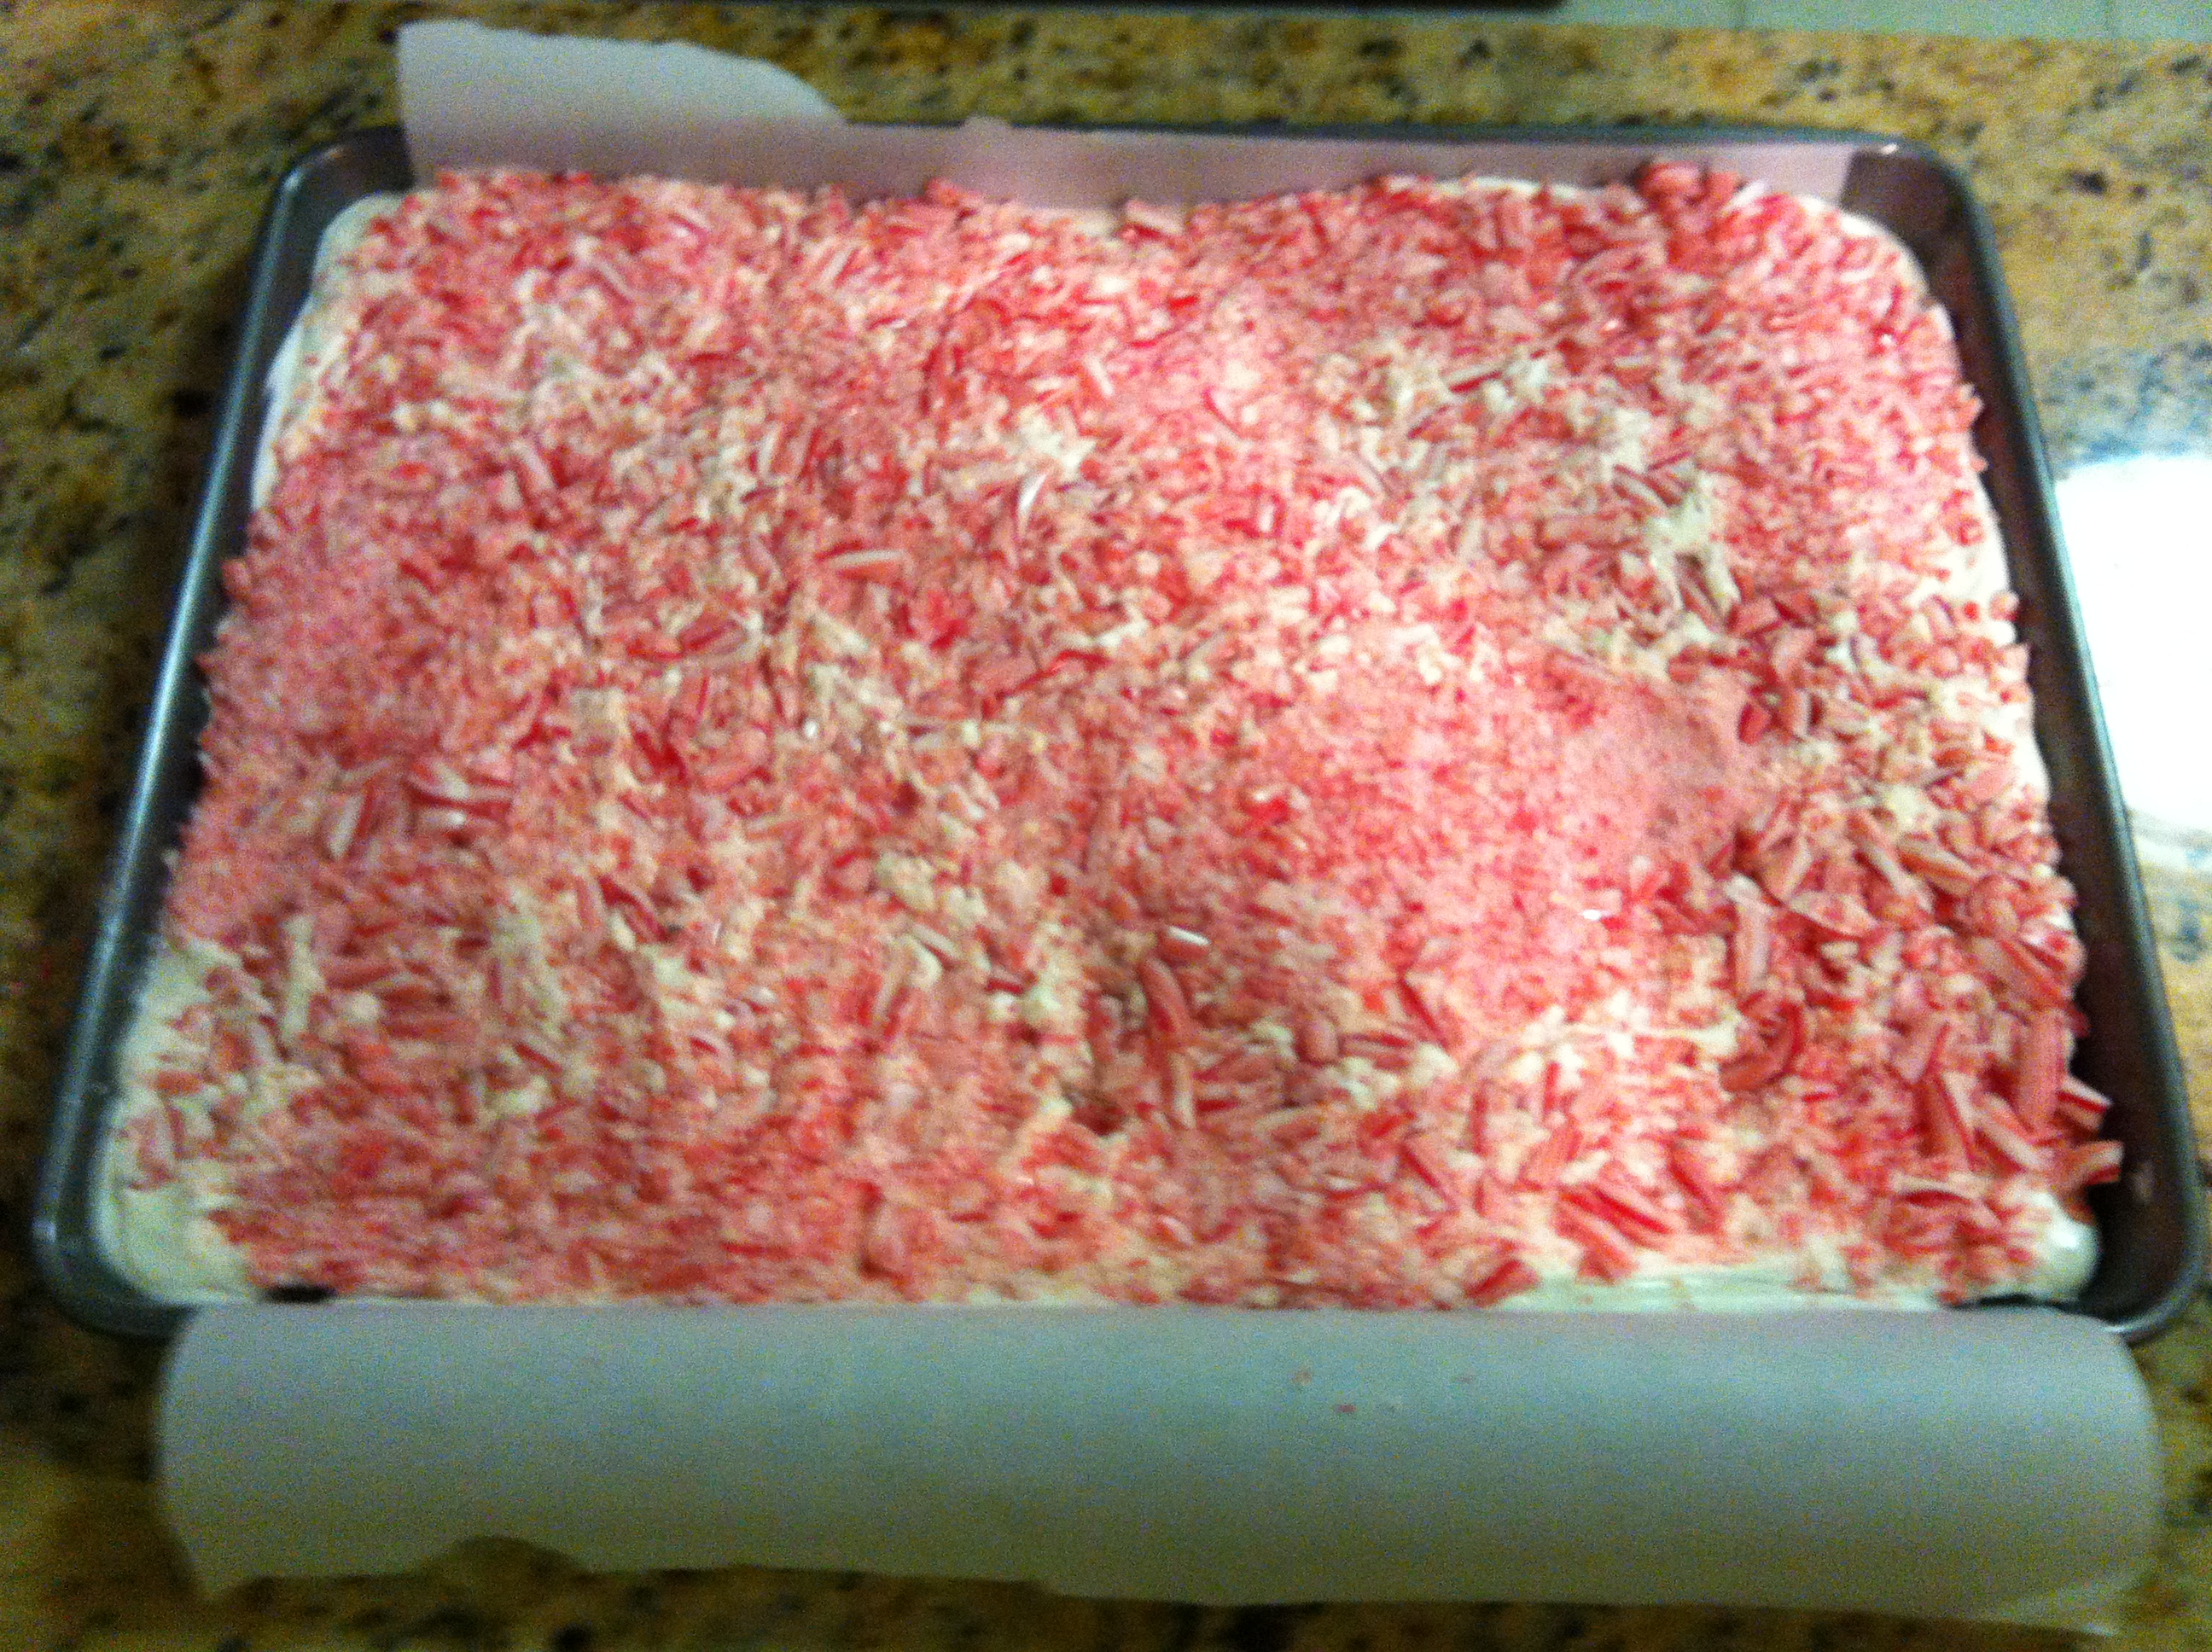
5.  Working quickly so the white chocolate is still wet, evenly sprinkle the crushed candy canes all over the top surface of the white chocolate.  Cover and place in the fridge until hardened, about 15+ minutes.

top with crushed candy canes


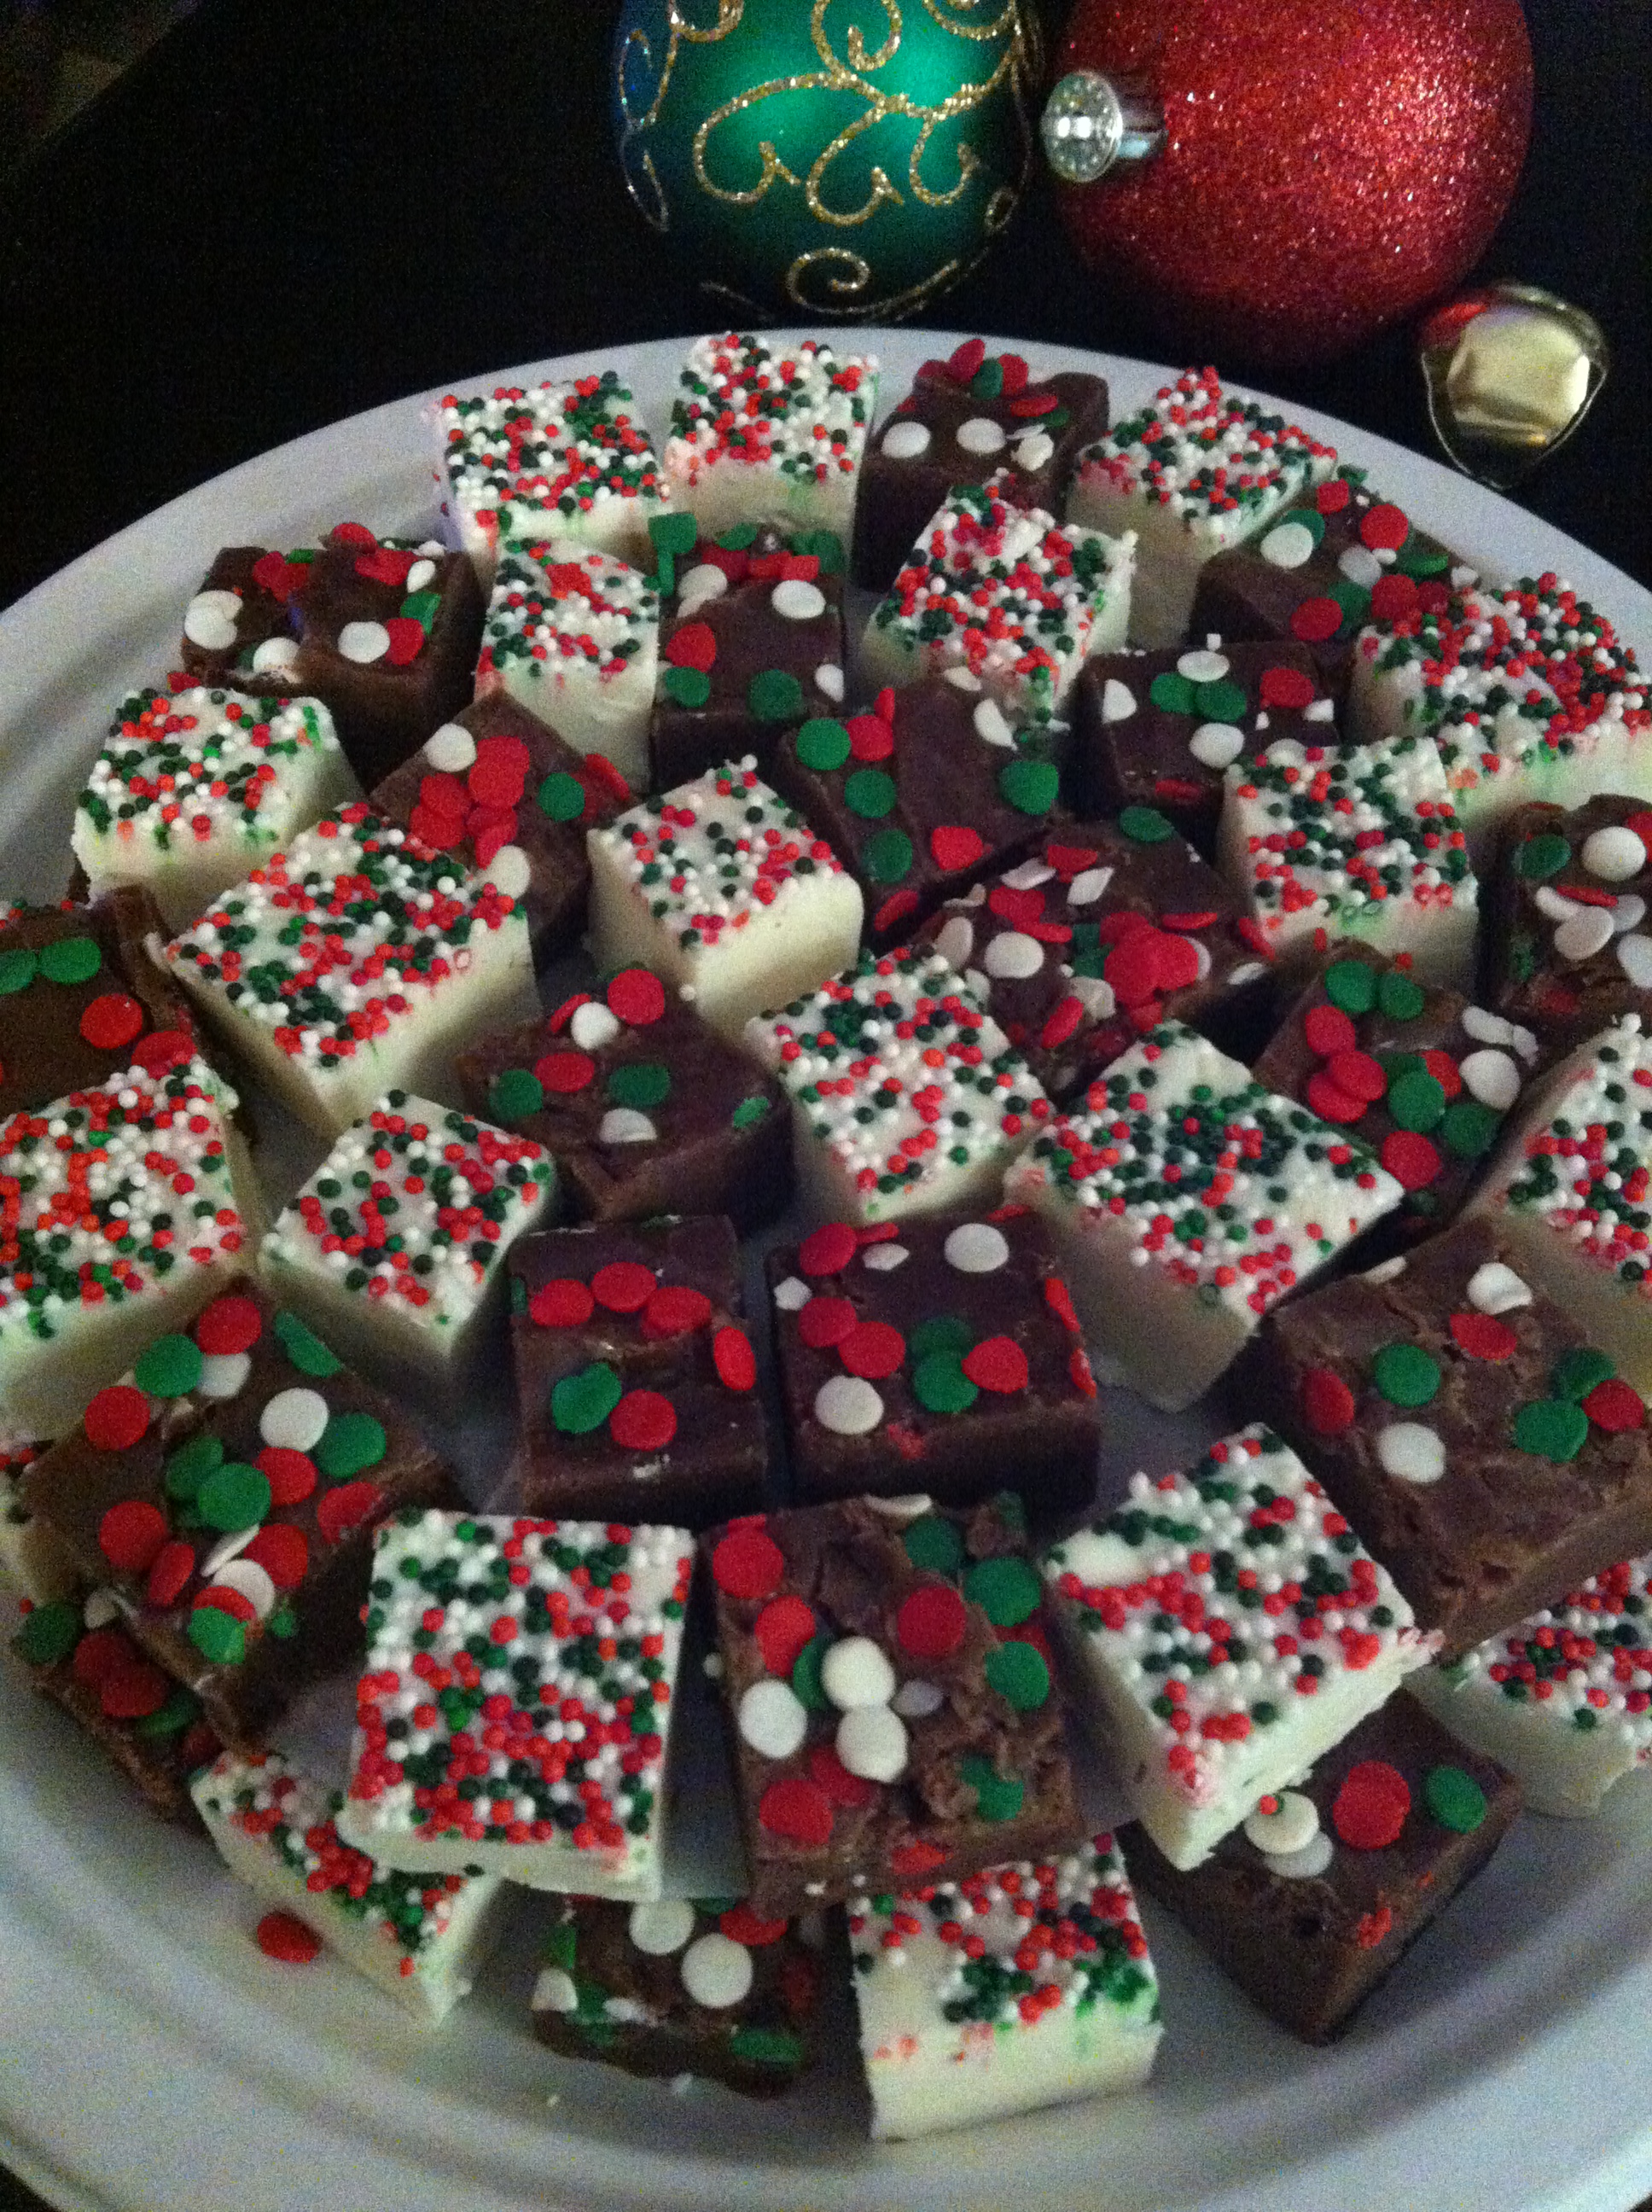
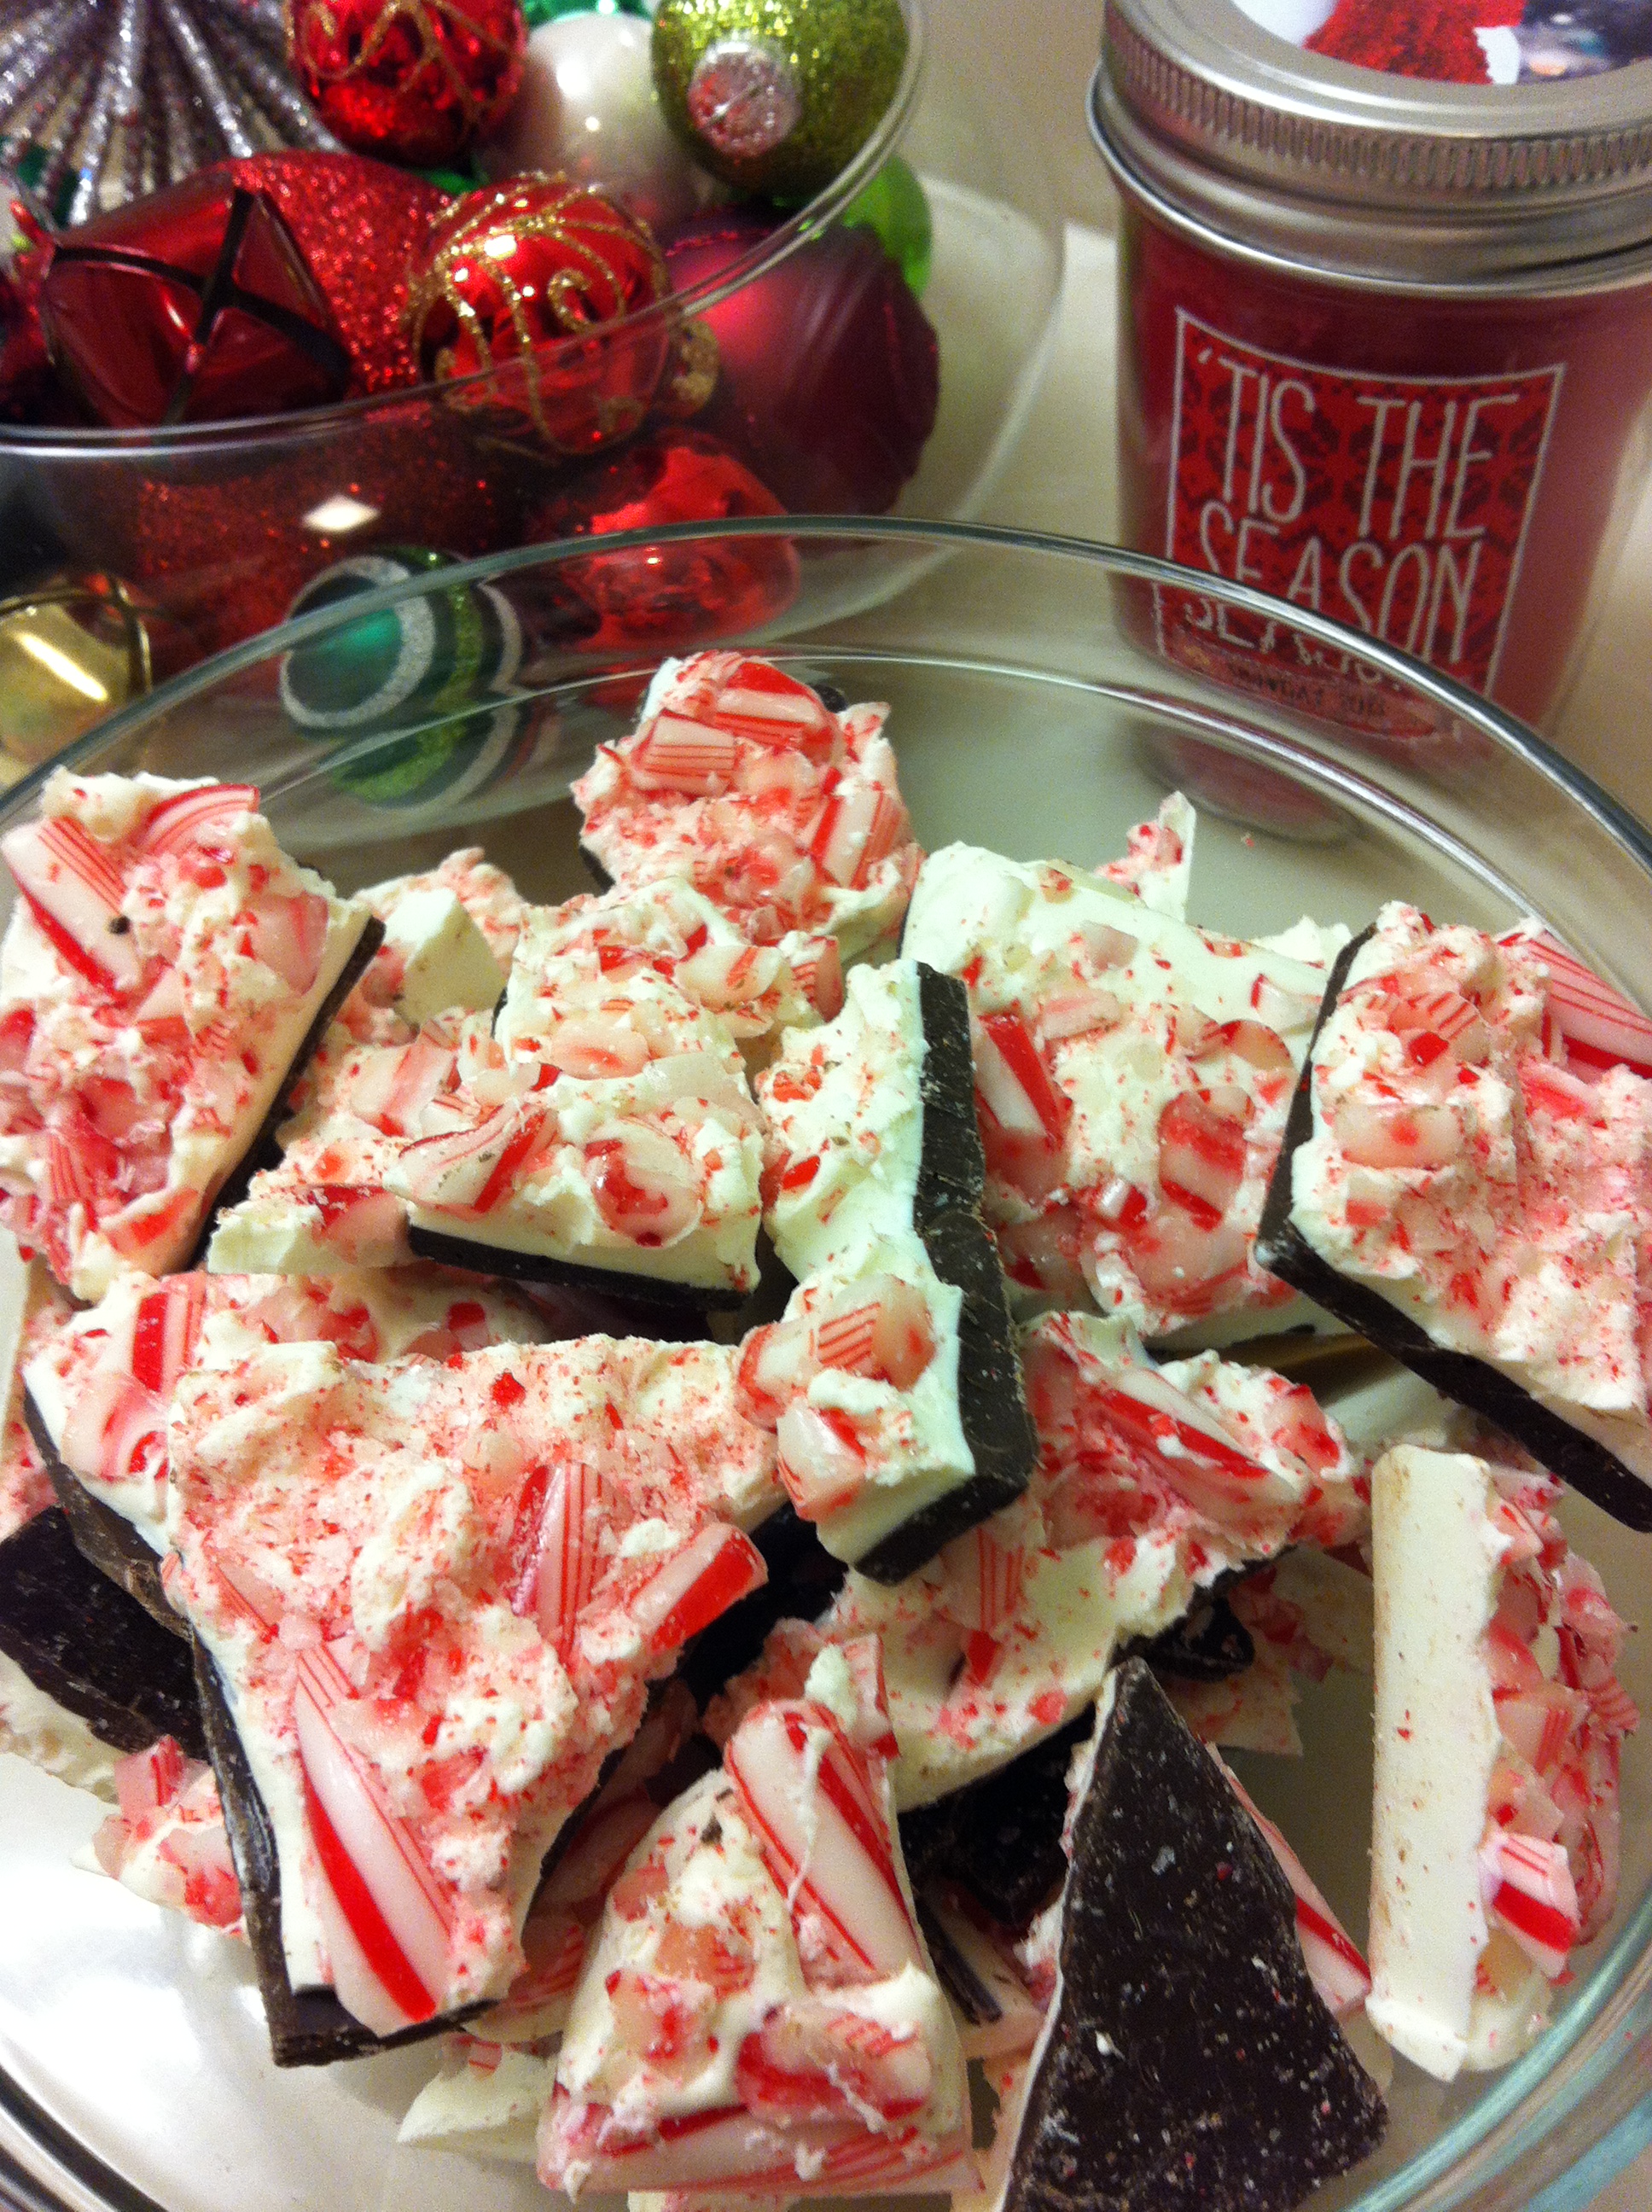
6.  Once the bark is totally hardened, remove it from the pan in large chunks, and snap it into bite-sized pieces with your hands.  (You can use a blunt knife too, but I find that leaves dents that aren’t so attractive.  For the prettiest bark, use your hands!)

break it into pieces


Now you’re ready to wrap up the bark to give it as gifts or just start munching!

peppermint bark 19


Notes about the chocolate:

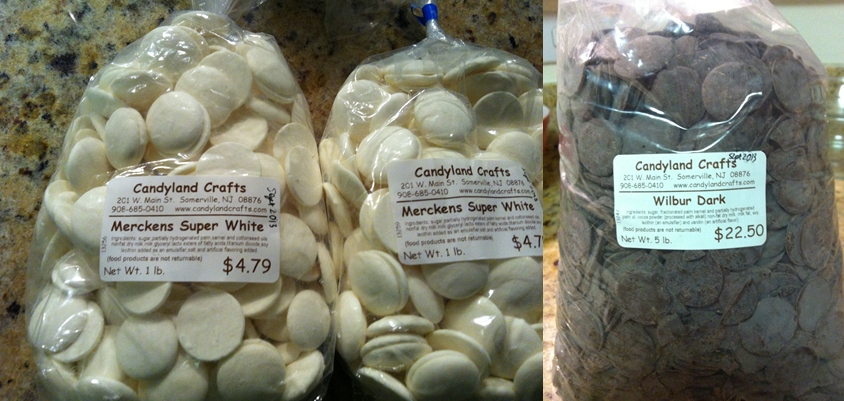
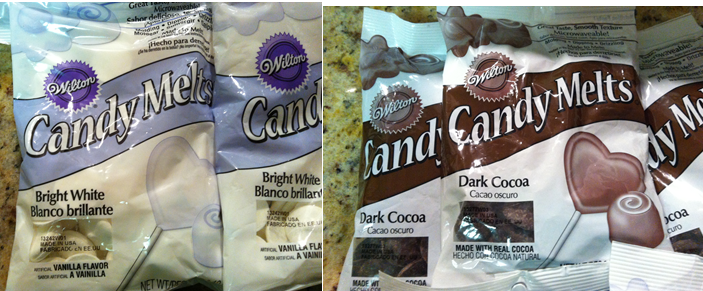
* For the dark chocolate, I prefer Wilbur Dark chips or Dark Cocoa Candy Melts by Wilton.  Of course, feel free to substitute milk chocolate for the dark chocolate if you like that better!

*For the white chocolate, I use Merckens Super White chips or Bright White Candy Melts by Wilton.  I like the “Bright White” or “Super White” because I think the regular white chocolate looks too dingy against the candy canes.  It’s more creamy/tan that white.

Here are photos:

chocolatechocolate

PDF to Print Recipe for Peppermint Bark

Share this:

  • Click to email a link to a friend (Opens in new window) Email
  • Click to share on Facebook (Opens in new window) Facebook
  • Click to share on X (Opens in new window) X
  • Click to share on Pinterest (Opens in new window) Pinterest
Like Loading...
← Older posts
Newer posts →

Enter your email address to follow JanisCakes and receive each new post by email.

This slideshow requires JavaScript.

Categories

Recent Posts

  • Soft Pumpkin Cookies with Apple Cider Glaze
  • Chicken Enchiladas
  • Ham, Apple and Brie Quesadilla
  • Cauliflower Bowtie Pasta
  • Loaded Baked Potatoes
  • Flank Steak Salad with Chipotle Lime Vinaigrette
  • No Bake Strawberry Pineapple Pie
  • Rhubarb Compote
  • Shiksa-Style Matzo Ball Soup
  • Homemade Caramel Corn

Archives

Enter your email address to follow this blog and receive notifications of new posts by email.

Blog at WordPress.com.

Privacy & Cookies: This site uses cookies. By continuing to use this website, you agree to their use.
To find out more, including how to control cookies, see here: Cookie Policy
  • Subscribe Subscribed
    • janis cakes
    • Join 82 other subscribers
    • Already have a WordPress.com account? Log in now.
    • janis cakes
    • Subscribe Subscribed
    • Sign up
    • Log in
    • Report this content
    • View site in Reader
    • Manage subscriptions
    • Collapse this bar
 

Loading Comments...
 

    %d