• Home
  • About JanisCakes
  • Recipe Index

janis cakes

~ A Nut-Free Cooking Blog

janis cakes

Category Archives: Bread

Whipped Blue Cheese and Poached Pear Toasts

09 Wednesday Mar 2016

Posted by Janis Chanin in Appetizers, Boozy, Bread, Fruit, Vegetarian

≈ Leave a comment

Whipped Blue Cheese Pear Toasts

This looks and tastes like a fancy schmancy appetizer, but I promise you it’s very simple to make.  It pairs especially well with dessert wine, which is exactly how I discovered it!  My friend Courtney recently suggested this recipe to me after I told her I planned to crack open a bottle of Far Niente’s dessert wine Dolce with my hubby that evening.  I highly recommend these elegant toasts, whether you’re simultaneously toasting with dessert wine or not!

Whipped Blue Cheese and Poached Pear Toasts
Yield:  8 appetizer servings
Time:  30 minutes

For the whipped blue cheese:
6 oz. blue cheese
4 oz. cream cheese (or Neufchâtel)
¾ tsp. red wine vinegar
1/8 tsp. salt
1 cup whipped cream

For the poached pears:
8 cups water
2½ cup sugar
6 cinnamon sticks
5 strips of fresh ginger (remove the outer skin from the ginger root, then create strips using a vegetable peeler)
4 Bosc pears (Bartlett or Anjou work too!)

Other:
1 baguette or loaf of other French bread
freshly cracked pepper
4 tbsp. honey

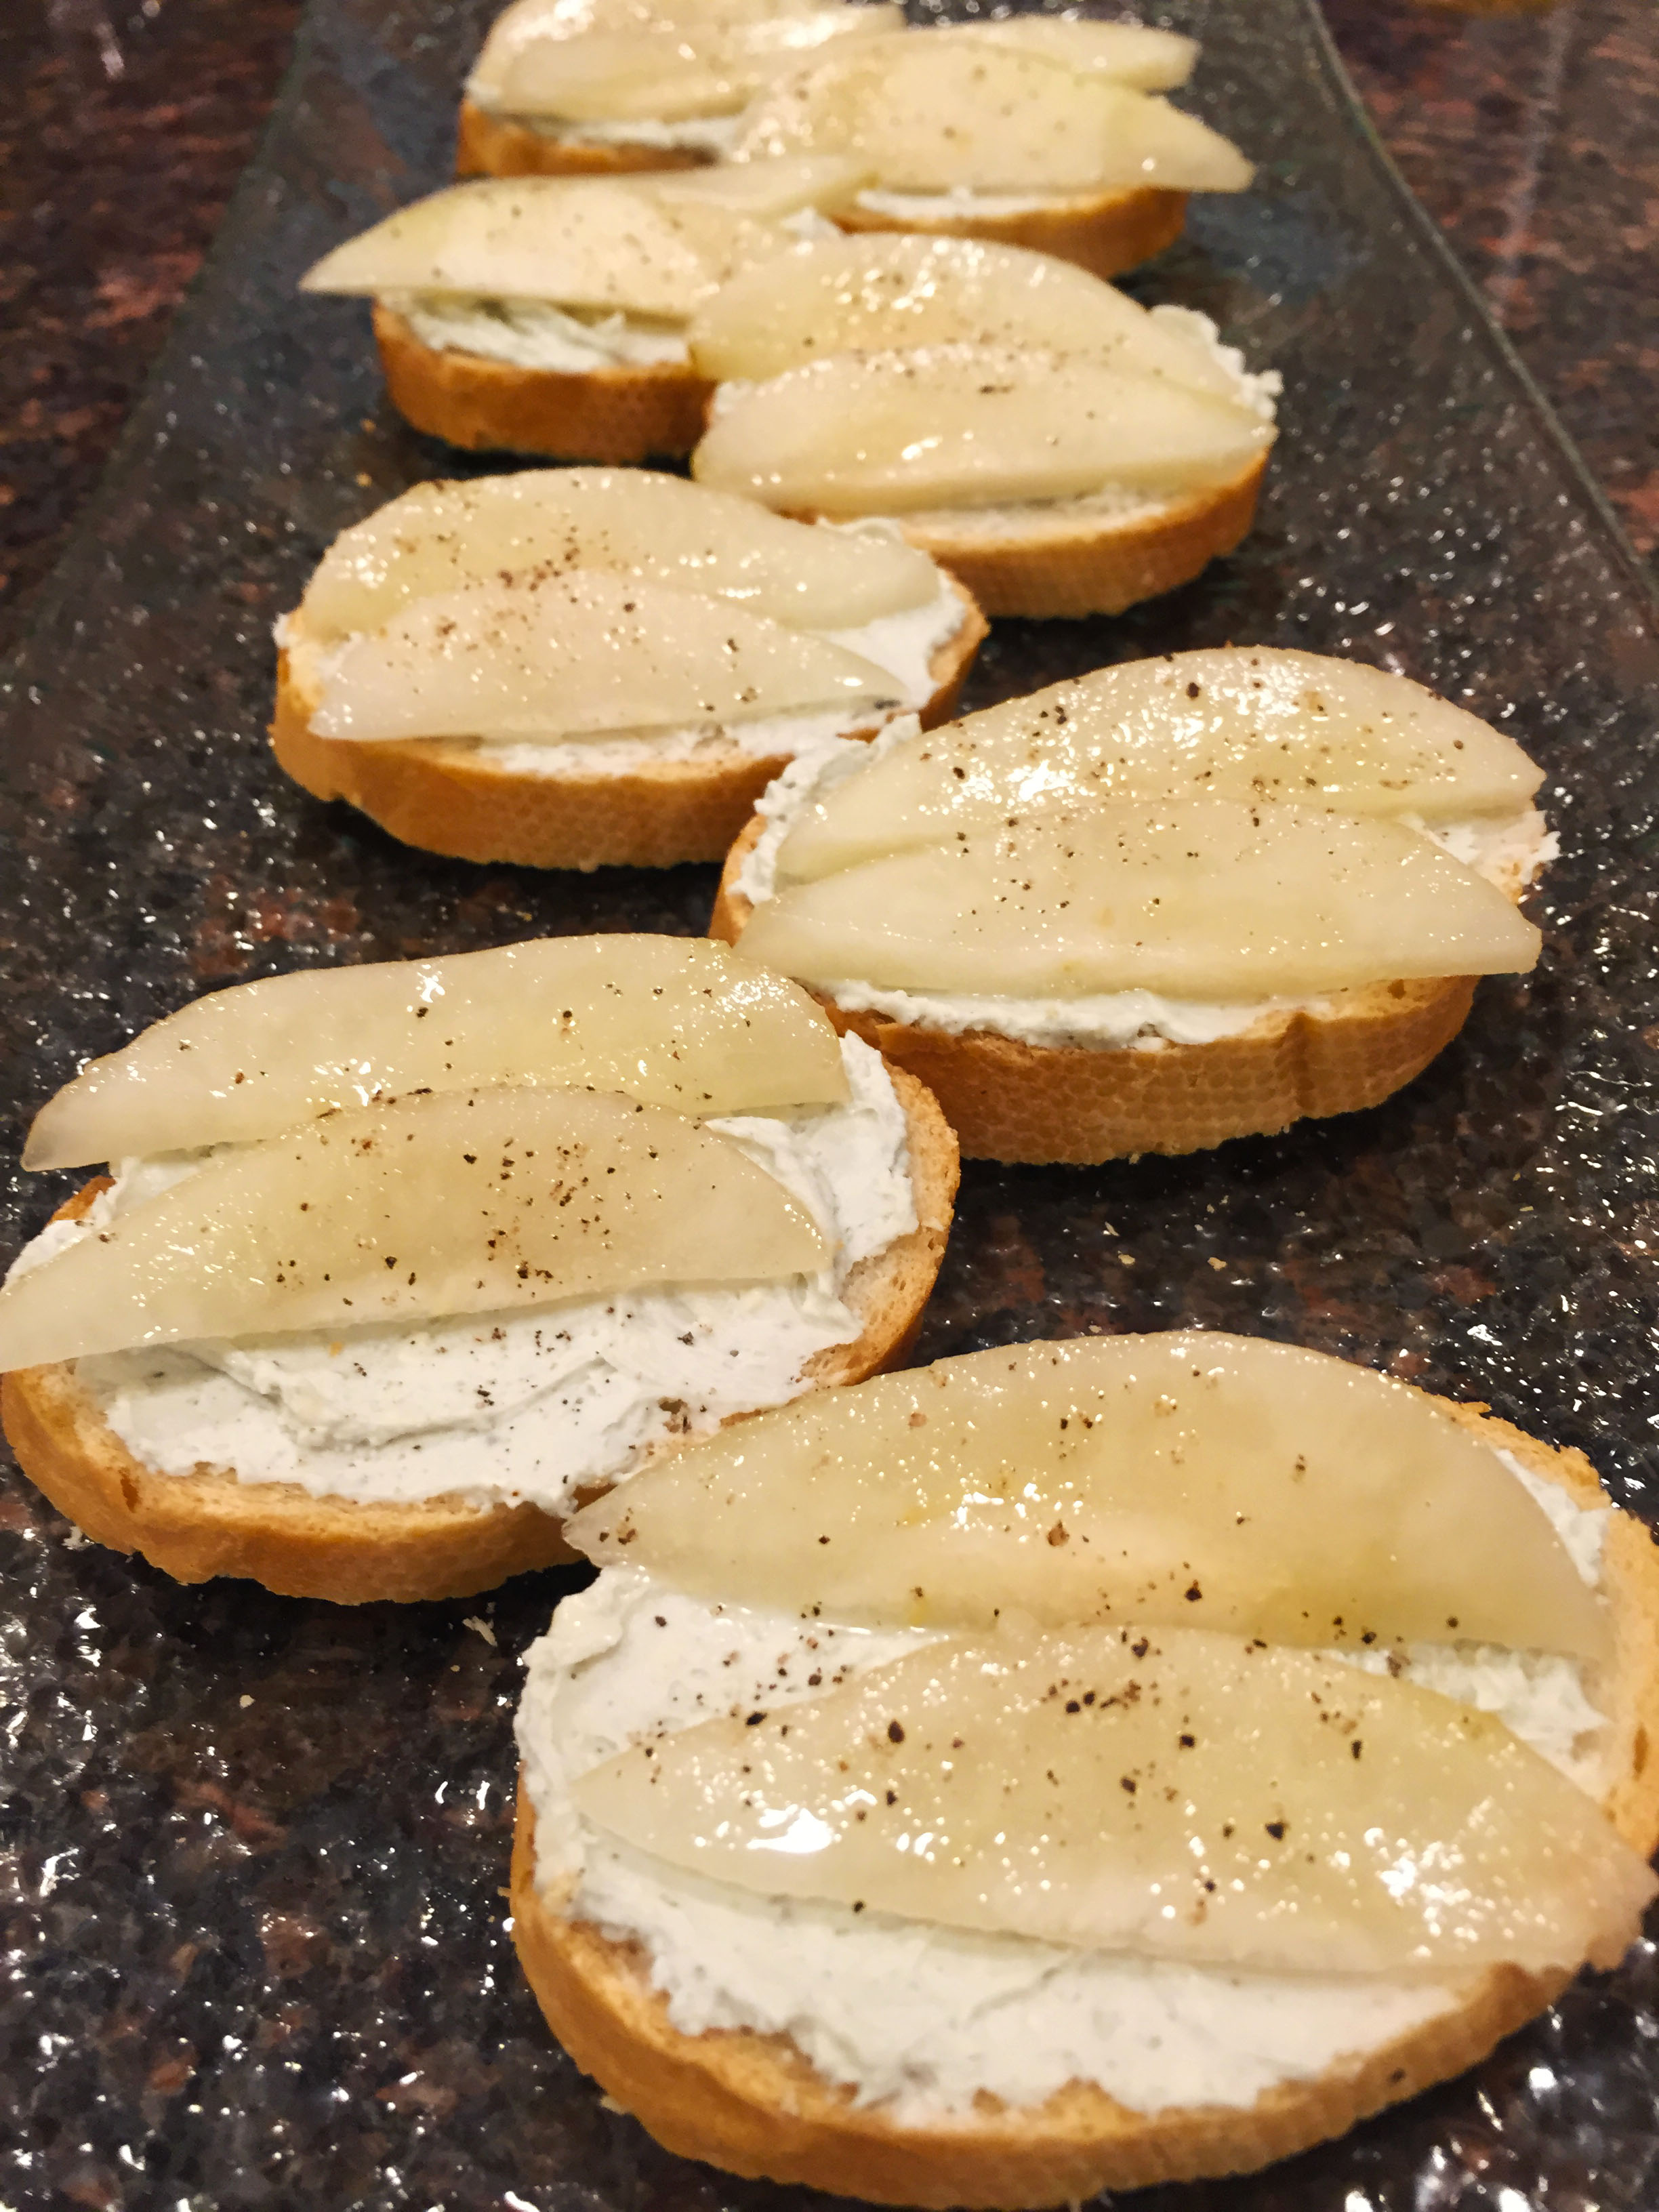
  1. Thinly slice the baguette and lightly toast until golden brown (about 5-8 minutes at 375ºF).
  2. To poach the pears, combine the water, sugar, cinnamon and ginger in a small saucepan.  Simmer over medium heat until gently boiling.  Keeping the stems of the pears intact, peel off the outer skin.  Submerge the pears into the boiling poaching liquid and continue to simmer over medium heat until the pears are softened, about 10 minutes.  Remove the pears from the liquid and allow to cool to room temperature.  Slice into quarters, remove the core, and thinly slice each quarter into about 5 slices.
  3. In the meantime, mash together the blue cheese, cream cheese, vinegar and salt.  Gently fold in the whipped cream and mix until well blended.
  4. Spread 1 tbsp. of the cheese mixture over each toasted baguette slice.  Place two slices of poached pear on top of the cheese mixture.  Lightly drizzle with honey and garnish with fresh cracked pepper.

Note:  The poaching liquid can be kept refrigerated for up to one week to poach additional pears and/or to be used as a pear-cinnamon-ginger simple syrup for cocktails.

PDF to Print Recipe for Whipped Blue Cheese and Poached Pear Toasts

This recipe was inspired by Far Niente’s recipe, which is available at: http://www.dolcewine.com/recipes/blue-cheese-mousse-with-vanilla-poached-pear-canape/?utm_source=Winery+Customers&utm_campaign=f52bc20046-DEC%2BDFNS%2BRecipe%2B2015&utm_medium=email&utm_term=0_42c452f99d-f52bc20046-229092593

Share this:

  • Click to email a link to a friend (Opens in new window) Email
  • Click to share on Facebook (Opens in new window) Facebook
  • Click to share on X (Opens in new window) X
  • Click to share on Pinterest (Opens in new window) Pinterest
Like Loading...

Lemon Poppy Seed Scones

27 Monday Jul 2015

Posted by Janis Chanin in Bread, Breakfast, Vegetarian

≈ Leave a comment

Tags

lemon poppy seed, scones

Lemon Poppy Seed Scones

I’ve never eaten a scone in my life before making these.  I had leftover buttermilk in my fridge after making Bacon Cheddar Cornbread, and wanted to put it to good use, so I tried making scones.  I sampled one as soon as they were cool enough to eat and thought it was pretty tasty, but having zero scone expertise, I was clueless as to whether or not they tasted like actual scones.  So I phoned a friend.  A very dear friend who happens to be British which in my mind, more than qualified her to be Official Taster And Judge of the Scones (or scaaaahns, as she calls them).  Her review?  They were more moist than most other scones she’s eaten, but she prefers them to be less dry.  Final verdict?  Delicious!  …and scone-like!

Lemon Poppy Seed Scones
Yield:  8 servings
Time:  15 minutes active;  35 minutes total

Scones:
1½ cups flour
3 tbsp. sugar
2 tsp. baking powder
½ tsp. baking soda
¼ tsp. salt
zest of one lemon
1½ tbsp. poppy seeds
5 tbsp. ice-cold butter
1 tbsp. lemon juice
2/3 cup buttermilk
1 egg
coarse sugar (I use Sugar In The Raw)

Glaze:
¾ cup confectioner’s sugar
½ tsp. vanilla bean paste (or vanilla extract)
1 tsp. poppy seeds

1.  Preheat the oven to 400°F.  Line a cookie sheet with parchment paper and lightly spray with baking spray.

2.  In a medium sized mixing bowl, combine the flour, sugar, baking powder, baking soda, salt, lemon zest, and poppy seeds.  Mix well to evenly distribute all ingredients, and to prevent over-mixing of the wet batter.  (Handling the moist dough as little as possible will produce the most tender scones.)

3.  Using a pastry blender, quickly cut the cold butter into the dry ingredients, creating a coarse meal.  The butter should be cut into pieces roughly the size of small peas.  (If the butter is too soft or cut too small, the scones can turn out coarse and dense.)

4.  In a small mixing bowl, whisk together the lemon juice and buttermilk.  Create a well in the middle of the flour mixture and pour in the lemony buttermilk.  Stir with a wooden spoon until just combined, being careful to not over-mix.  Knead gently with your hands if necessary to incorporate all of the flour.  Place the dough on a lightly floured cutting board, creating a circle that’s roughly one-inch thick.  Cut the circle like a pizza into 8 slices.  Transfer each slice to the prepared cookie sheet, leaving room between pieces for them to expand.

5.  Beat the egg and brush onto the surface of each slice of dough.  Sprinkle with coarse sugar, and bake at 400°F for 16-18 minutes, until golden brown on top.  Allow to cool completely.

6.  To make the glaze, whisk together the confectioner’s sugar, vanilla, and poppy seeds.  Drizzle over cooled scones and set aside until the glaze is fully dried.

PDF to Print Recipe for Lemon Poppy Seed Scones

Lemon Poppy Seed Scones Lemon Poppy Seed Scones

Share this:

  • Click to email a link to a friend (Opens in new window) Email
  • Click to share on Facebook (Opens in new window) Facebook
  • Click to share on X (Opens in new window) X
  • Click to share on Pinterest (Opens in new window) Pinterest
Like Loading...

BBQ Chicken Pizza

14 Tuesday Jul 2015

Posted by Janis Chanin in Bread, Dinner, Quick and Easy

≈ Leave a comment

Tags

BBQ chicken pizza, grilled pizza

BBQ Chicken Pizza

There was a pizzeria underneath my apartment in Boston that made incredible BBQ Chicken Pizza.  There were too many nights to remember where a crowd would end up back at my place and we’d feast on BBQ Chicken Pizza.  I long for those nights with amazing friends.  Here’s my attempt at recreating the pizza that I miss so much!

BBQ Chicken Pizza
Yield: 8 slices
Time:  Less than 30 minutes total

1 ball of prepared pizza dough (store bought, homemade, or from your favorite pizzeria!)
6 oz. tomato paste
¾ cup BBQ sauce
1 cup shredded Gouda cheese
¾ cup shredded mozzarella cheese
¼ of a red onion, thinly sliced
2 cooked chicken breasts*
1 handful fresh cilantro, coarsely chopped
¼ cup cornmeal

*Cook the chicken however you like…grilled, boiled, and baked would all work!

1)  Place your pizza stone on the grill and close the cover.  Preheat the grill and stone.

2)  Shred the cooked chicken breasts using two forks.  Toss with half of the BBQ sauce.

3)  Stir the remaining BBQ sauce with the tomato paste.

4)  Toss the dough into a large circle (or something that resembles a circle!  Mine are never quite round, although I try!)  Be careful not to burn yourself while handling the hot pizza stone!  Sprinkle the surface with cornmeal, then transfer the dough to the hot pizza stone.  Spread the sauce mixture over the surface and sprinkle with both cheeses.  Arrange the red onion slices on top and drop the shredded saucy chicken in clumps over the entire surface.  Return to the grill and cook, with the cover closed, over direct high heat until fully cooked, about 10 minutes.

5)  Sprinkle chopped cilantro before serving.


Alternate cooking methods:

Don’t have a pizza stone?  Although I haven’t tried it yet, I’ve been told that you can put the dough directly onto the grates of the grill.  If you try this method, cook the dough for about 2 minutes before putting any sauce or toppings on.  Flip the dough and cook the other side for 1-2 minutes before topping with sauce, cheese, onion, and chicken.

Don’t have a grill?  Use your oven!  Just be sure to put your pizza stone (or heavy cookie sheet) in the oven as it preheats to get it screaming hot before putting the dough on it.  Use a very hot oven, close to 500°F.  Cooking time may be a little longer in the oven compared to the grill, with a total cooking time of 15-20 minutes.


PDF to Print Recipe for BBQ Chicken Pizza

Share this:

  • Click to email a link to a friend (Opens in new window) Email
  • Click to share on Facebook (Opens in new window) Facebook
  • Click to share on X (Opens in new window) X
  • Click to share on Pinterest (Opens in new window) Pinterest
Like Loading...

Chocolate Chip Biscotti

16 Tuesday Jun 2015

Posted by Janis Chanin in Bread, Breakfast, Chocolate, Dessert, Vegetarian

≈ Leave a comment

Tags

biscotti, chocolate chip biscotti, coffee and biscotti

Chocolate Chip Biscotti

This recipe is one of my mom’s favorites.  Every time we get together for breakfast or brunch, she requests that I make my chocolate chip biscotti, claiming it’s the best she’s ever had.  Let’s hope you agree!  (In the photo above, I made half the biscotti using this recipe, and the other half was chocolate cherry biscotti, to create the plate of “zebra biscotti”!)

Chocolate Chip Biscotti
Time:  10 minutes prep; 40 minutes total
Yield:  40 pieces

½ cup canola oil
1 cup sugar
3 eggs
1 tsp. vanilla extract
3½ cups flour
1 tsp. baking powder
¾ cup mini chocolate chips
1.  Preheat the oven to 375ºF.  Lightly grease a jelly roll pan and set aside.

2.  Whisk together the oil, eggs, sugar, and vanilla.

3.  In a separate bowl, combine the flour and baking powder.  Slowly combine the flour with the oil/sugar mixture, forming a sticky ball of dough.  Mix in the mini chocolate chips, kneading gently with your hands.

4.  Divide the dough into two pieces.  Roll into two separate logs, each roughly the length of the jelly roll pan.  Place on the prepared pan and gently pat down to flatten to about a 1-inch thickness.

5.  Bake at 375ºF for 22-27 minutes, until golden brown.  Remove from the oven and allow to cool just enough that it’s comfortable to touch.  Cut into ½-inch wide slices.  Return the slices to the pan, cut-side up.  Bake for an additional 6-10 minutes to lightly toast the surface.  Store in a sealed container for up to one month.

PDF to Print Recipe for Chocolate Chip Biscotti

Chocolate Chip Biscotti

Chocolate Chip Biscotti

Chocolate Chip Biscotti

Chocolate Chip Biscotti

Share this:

  • Click to email a link to a friend (Opens in new window) Email
  • Click to share on Facebook (Opens in new window) Facebook
  • Click to share on X (Opens in new window) X
  • Click to share on Pinterest (Opens in new window) Pinterest
Like Loading...

Pineapple Carrot Bread

04 Wednesday Mar 2015

Posted by Janis Chanin in Bread, Breakfast, Healthy

≈ 2 Comments

Tags

carrot bread, carrot pineapple

Pineapple Carrot Bread

I am so excited about this recipe!  It’s rare that I pull something out my oven, taste it, then run to my computer to blog it, but that’s exactly what just happened.  This bread is so fantastic that I had to share it with you immediately!  I just devoured a slice and typing this up is helping me from chowing down on the rest of the loaf!  You’re going to love it because it has fresh springtime flavors such as carrots and orange zest.  Crushed pineapple keeps the bread moist while lending a little extra sweetness.  Raw sugar sprinkled on top gives the outside a nice little crunch.  I highly recommend baking a loaf for Easter breakfast next month!  To make it extra special, try topping it with a cream cheese frosting!

Pineapple Carrot Bread
Yield:  One 9″ x 5″ loaf (about 10 slices)
Time:  10 minutes active; 70 minutes total

1½ cups sugar
2 eggs
1/3 cup canola oil
1 tsp. vanilla extract
1/3 cup low fat plain yogurt
6 oz. crushed pineapple (with juice)
1¾ cups all-purpose flour
1 tsp. cinnamon
¼ tsp. salt
1 tsp. baking powder
¾ tsp. baking soda
1½ tsp. fresh orange zest
1 cup shredded carrots (roughly 1½ to 2 carrots)
1 tbsp. raw sugar (I use Sugar In The Raw)

1.  Lightly grease the sides and bottom of a metal 9″ x 5″ loaf pan.  Set aside.  Preheat your oven to 350ºF.

2.  Beat together the sugar, eggs and oil.  Stir in the vanilla extract, yogurt, and pineapple.  Set aside.

3.  In a medium mixing bowl, combine the flour, cinnamon, salt, baking powder, and baking soda.  Slowly whisk the dry ingredients into the wet ingredients.

4.  Fold in the carrots and orange zest.  Pour into the prepared loaf pan.  Evenly sprinkle the surface of the batter with 1 tbsp. raw sugar.  Bake for 55-60 minutes, until the top is golden brown and a toothpick inserted into the center of the bread comes out clean.  Allow to cool at room temperature for 15 minutes before removing from the pan.  (I recommend running a butter knife or spatula along the sides to help loosen it before inverting the pan.)  Slice once cool enough that it doesn’t crumble.

PDF to Print Recipe for Pineapple Carrot Bread

Recipe credit:  This recipe was inspired by a cake recipe that I received from my mother-in-law’s good friend Lois at my bridal shower.

Pineapple Carrot Bread

Share this:

  • Click to email a link to a friend (Opens in new window) Email
  • Click to share on Facebook (Opens in new window) Facebook
  • Click to share on X (Opens in new window) X
  • Click to share on Pinterest (Opens in new window) Pinterest
Like Loading...
← Older posts

Enter your email address to follow JanisCakes and receive each new post by email.

This slideshow requires JavaScript.

Categories

Recent Posts

  • Soft Pumpkin Cookies with Apple Cider Glaze
  • Chicken Enchiladas
  • Ham, Apple and Brie Quesadilla
  • Cauliflower Bowtie Pasta
  • Loaded Baked Potatoes
  • Flank Steak Salad with Chipotle Lime Vinaigrette
  • No Bake Strawberry Pineapple Pie
  • Rhubarb Compote
  • Shiksa-Style Matzo Ball Soup
  • Homemade Caramel Corn

Archives

Enter your email address to follow this blog and receive notifications of new posts by email.

Blog at WordPress.com.

Privacy & Cookies: This site uses cookies. By continuing to use this website, you agree to their use.
To find out more, including how to control cookies, see here: Cookie Policy
  • Subscribe Subscribed
    • janis cakes
    • Join 82 other subscribers
    • Already have a WordPress.com account? Log in now.
    • janis cakes
    • Subscribe Subscribed
    • Sign up
    • Log in
    • Report this content
    • View site in Reader
    • Manage subscriptions
    • Collapse this bar
 

Loading Comments...
 

    %d