
Warning: People go crazy for these decadent little chocolate-covered brownie balls! I recommend making them in bulk because they get gobbled up faster than you can possibly imagine! My husband brought a ton into work this week and put them out on his desk before he went to a meeting. They evaporated by the time he got back, and people were immediately demanding the recipe. I had similar results at my work, where they lasted about 4 minutes longer!
One of the huge advantages of this recipe is that it’s super accommodating to your schedule! If you want to make them in stages, you totally can. Or if you prefer to make dessert for an event a week or two in advance, then freeze and forget about it until the morning of your party–these are perfect! See the note at the end of the recipe for my make-ahead tips.
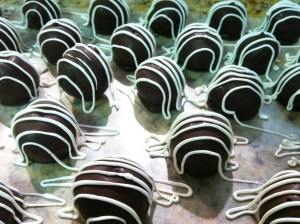
Death By Brownie Bites
Yield: 50 to 60 bites (each 1-inch in diameter)
Time: 60 minutes active; 4½ hours total (including chilling and freezing)
Ingredients:
1 box brownie mix with required ingredients (i.e.: canola oil, water, eggs) (I like the Chewy Fudge Brownies by Duncan Hines)
1 tub (about 14 oz.) prepared chocolate frosting
12 oz. dark chocolate*
To decorate: 4 oz. white chocolate* or sprinkles/mini chocolate chips/mini M&Ms…
toothpicks
waxed paper
* My favorite chocolate for this recipe is Merckens because it melts incredibly smoothly and it leaves a glossy finish. Candy Melts by Wilton work well too if you can’t find Merckens.
Instructions:
1) Bake one box of brownies, following the instructions on the box. Once fully cooled, crumble into pieces and mix in the tub of frosting. (The mixture will feel like the consistency of raw meatballs.) Chill in the refrigerator for at least one hour, or overnight.
2) Roll chilled batter into balls that are roughly 1 inch in diameter. Place on a freezer-safe dish lined with waxed paper. Freeze in a single layer for at least 2 hours, up to 4 days.

3) Melt the dark chocolate and stir until smooth. Have a few toothpicks handy and line your counter with waxed paper. Remove about 8 balls from the freezer at a time. Gently press a toothpick about ¼ to ½ of the way into the ball. Holding the toothpick, submerge the ball in melted chocolate and cover entirely, using a spoon to help if needed. Drop onto waxed paper to dry. Hopefully the ball will fall off the toothpick easily. If it doesn’t, just leave the toothpick in and remove it once the chocolate is dried. Either way, there may be a small “hole” on top that’s missing chocolate. Fill in the hole with melted chocolate using a clean toothpick. Repeat with all balls. (If you’re decorating using sprinkles, mini chocolate chips, mini M&Ms, or anything else that needs to stick to the melted chocolate, do that as the chocolate is still wet.)

4) To decorate with a white chocolate drizzle, melt the white chocolate and mix until smooth. Pour the melted chocolate into a small ziplock bag and snip off the slightest bit of the corner of the bag with scissors. Squeeze the chocolate out of the small hole, drizzling in a zig-zag pattern over the brownie balls. Toss the bag when you’re done–no mess or clean up or special tools required for such a classy decoration!
Make-Ahead Tips: The Death By Brownie Bites can be prepared in stages or made entirely ahead of time! If making a week or two in advance, simply freeze the decorated balls and take them out of the freezer an hour before serving. Just be sure not to decorate with mini chocolate chips, as I notice the chips tend to get a white film over them after being frozen. If you have chunks of time to get things done, feel free to stop after Step 1 and leave the mixture in your fridge for up to three days. Pick back up with Step 2 whenever you have time! You can take another hiatus after Step 2 if you need. I often leave the frozen balls (before they’re dipped in chocolate) in my freezer for up to a month! They’ll stay fresh as long as they’re well sealed. (Wrap in plastic wrap, and place in a ziplock bag. Place in a larger ziplock bag and seal tight.) Need another break after Step 3? Seal the chocolate-dipped balls and freeze up to a month. How’s that for a recipe that works around your schedule for once??!
PDF to Print Recipe for Death By Brownie Bites

 This recipe looks and sounds fancy, but it comes together really easily and truthfully doesn’t take much effort at all. You can’t beat that!